Page 23 of 27
Re: Fuel injection rebuild
Posted: Wed Mar 11, 2020 8:42 pm
by Riaan.N
Is that an Empi breather box?
Does the crank pully use a sand seal or does it have the same spiral/worm thingy as the oem pullies?
Any specific reason for going with the SCAT serpentine setup?
I think you have talked about it before...about the fuel line fittings. With which type of fittings did you go....and why?
Re: Fuel injection rebuild
Posted: Wed Mar 11, 2020 9:18 pm
by Simmy
The breather is a Scat unit. Bought it ages ago and am not sure how much blow by it will tolerate. I would get something bigger in hindsight.
After a bit of research, I decided to skip the sand seal and leave it as stock. The pulley does have the screw machined into it, so should be happy. I also added the extra case vent near the flywheel to avoid oil excessive oil blow-by, and will also connect that to the breather too.
The belt set-up is mostly just bling, but I do find it easier to tension the belt. Not sure if there are any horror stories with these, but my pulleys are lined up, so I don't expect it to hop off or slip much.
And the fuel fittings are fairly standard AN6 pieces from FTF. The hose is braided rubber, rather than teflon, since I am not going to run alcohol fuels through it. The reason for going this way is partially because I like the look they give to the engine bay and also because I don't trust most fuel lines... They seem to crack far too quickly for my liking, and I have no intention of building a fireball!
Re: Fuel injection rebuild
Posted: Sun Mar 15, 2020 1:07 pm
by Simmy
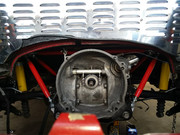
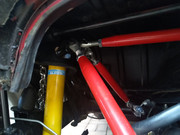
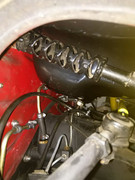
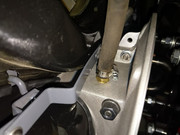
Work has shifted to the mendeola truss. I am really happy with the quality of the parts, but trial fitment showed it needed some massaging. I think the angles of the bolts for the shocks top mount are a little off relative to the design state. That has caused the plate to rotate a couple of degrees more than it normally would as you can see.
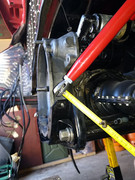
It could also do with a slightly longer cross bar, but it still has enough thread engagement that I am not overly worried.
Since the plate is too thick for me to bend at home, I opted for a cut, bend and weld approach.
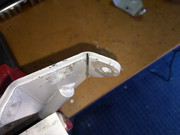

Thankfully that seems to have sorted the rear. Note that the gearbox cradle had to be cut away to clear the lower tabs.

Re: Fuel injection rebuild
Posted: Mon Mar 16, 2020 9:39 am
by Simmy
Although just mocked up, it looks like everything now fits.

Re: Fuel injection rebuild
Posted: Mon Mar 16, 2020 8:16 pm
by fourier
Have you checked that everything still fits with the exhaust in place. Best would be to mock that up first to check clearance, before final welding.
Re: Fuel injection rebuild
Posted: Tue Mar 17, 2020 12:53 pm
by Simmy
fourier wrote: ↑Mon Mar 16, 2020 8:16 pm
Have you checked that everything still fits with the exhaust in place. Best would be to mock that up first to check clearance, before final welding.
You would be correct if I was going to use the heater boxes, but J-Tubes work fine. Here is the mock up from a couple months back:
Re: Fuel injection rebuild
Posted: Tue Mar 17, 2020 8:56 pm
by fourier
Good that you checked it!
I just remember having interference issues with my CSP brace and A-1 sidewinder set-up, and had to alter a few mounting points.
Re: Fuel injection rebuild
Posted: Wed Mar 18, 2020 12:21 pm
by Donovan D
Simmy wrote: ↑Mon Mar 16, 2020 9:39 am
Although just mocked up, it looks like everything now fits.
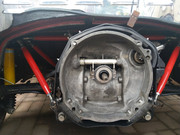
Do those brackets go between the gearbox and the pan ?
Does that not push out the gearbox and engine, how does that affect the nosecone mount ?
Re: Fuel injection rebuild
Posted: Wed Mar 18, 2020 1:49 pm
by Simmy
Donovan D wrote: ↑Wed Mar 18, 2020 12:21 pm
Do those brackets go between the gearbox and the pan ?
Does that not push out the gearbox and engine, how does that affect the nosecone mount ?
They do - they are 5mm thick. The slots in the cradle take up most of that (3mm or so?) I would imagine that the rest is shared between the flex in the two rear mounts and the nose cone. My feeling is that it's a relatively minor stress addition, but I will add a mid-mount at some point to help the nose cone.
Re: Fuel injection rebuild
Posted: Fri Apr 10, 2020 6:43 pm
by Simmy
Hi fellow inmates!
I hope everyone reading is keeping sane and healthy

Despite the silence, there has been progress!
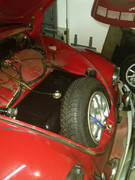
Embarrassed by how dirty the car has become prompted a clean and polish.

The truss bar was finished off. Everything bolted down with relatively little cussing.
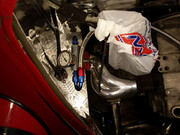
The fuel tank is also in and brakes have been bled. I forgot to seal the thread on the master cylinder feed, so that made a wonderful mess... But all sorted fairly easily with some teflon. Also had to move one of the fuel lines which was catching the rear of the tank.
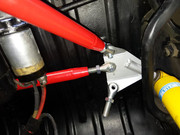
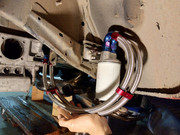
The oil filter is also now installed. Mocked it up with the exhaust and the old case to check for clashing.
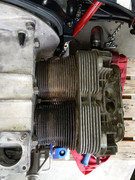
And finally the engine is together with all the ancillaries!
Fitting the manifolds was a real pain!
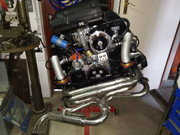
Some details for the interested:
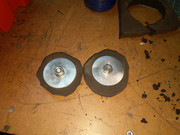
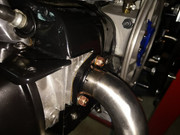
The heaters were blocked off with some rubber bungs which compress into place. I didn't know what to do since the heater boxes are gone, so this seemed the easiest thing to do. Made up the heater pipe flanges a while ago to neaten up and seal the ports.
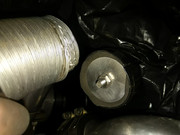
The rear vent turned out to be a bit of a mistake. It didn't clear the cooling flap cross bar, which I didn't account for. If anyone else does try this, keep it as far forward as you can manage.
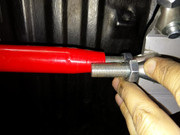
Decided to try copper exhaust nuts this time, as opposed to stainless with lock washers. The copper nuts take a size 12 spanner which just gives a little more clearance on the pulley side.
Lastly, checked the clearance on the fuel rails. Thanks to the stainless firewall, it does create more space than the standard one.
Re: Fuel injection rebuild
Posted: Sat Apr 11, 2020 7:51 am
by Wentzel
Looking great, should be running soon?
Re: Fuel injection rebuild
Posted: Sat Apr 11, 2020 7:57 am
by AlanH
Lots done, seems you also have lots of spare time currently.

Nice work, will be good to see it running soon.
Re: Fuel injection rebuild
Posted: Sat Apr 11, 2020 11:30 am
by Riaan.N
Hi Simmy,
The bug looks very nice!

Everything is coming together now

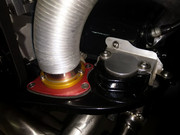
Where/what are these fresh air hose adaptors? They look very good!
Simmy wrote:
Re: Fuel injection rebuild
Posted: Sat Apr 11, 2020 12:39 pm
by Simmy
Thanks all! And especially to those who assisted along the way.
Wentzel wrote: ↑Sat Apr 11, 2020 7:51 am
should be running soon?
I hope so. There are a bunch of niggly little items left, and will only be able to get them after the lockdown ends. But hopefully soon thereafter.
Riaan.N wrote: ↑Sat Apr 11, 2020 11:30 am
Where/what are these fresh air hose adaptors? They look very good!
They are indeed. They bolt up and seal off the exhaust space better than the stock arrangement. They would normally feed into the two "ears" on the exhaust, before coupling the heater boxes.
Re: Fuel injection rebuild
Posted: Sat Apr 11, 2020 3:45 pm
by Haans
Boet,.....that engine is really a masterpiece !! Much appreciate you sharing your work with us,......inspiring!
Great job
Haans