Bluebird to `GruntY
-
splitfan

- Carburettor
- Posts: 1966
- Joined: Fri Jul 20, 2007 1:23 pm
- What model do you have?: 56,71,75
- Location: Port Shepstone KZN
- Has thanked: 46 times
- Been thanked: 26 times
- Contact:

Re: Bluebird to `GruntY
Die seats en wiele is awesome ! kannie wag om die ding aanmekaar te sien nie !
My biggest fear is that my wife sells my cars for what i told her they cost !!
-
hennels
- Oil Stain
- Posts: 110
- Joined: Tue Oct 02, 2012 9:54 am
- What model do you have?: Beamish
- Location: Cape Town
- Has thanked: 3 times
Re: Bluebird to `GruntY
Ek het so agter gekom. Na baie ure se in en flippen uit... Ekt amper op gegee toe vra ek maar vir iemand wat ken, en hulle stel toe voor ek sit n spacer of n ding daar in, het so gemaak en hy sit nou BAIE mooi reguit.Ron&Gill wrote:As jy nou daai mooi seats direk op die seat runners terug sit, dan sal jy sien hulle sit skeef. As jy aan die regterkant n 44mmX22mm stuk meranti van voor tot agter onder die sitplek monteer, dan's hy mooi reggop. Dis maar n ou Beamish ding daai.
Ek dink ek het daai ICH's verkoop aan Renier, hy't so n siek geel buggy gehad wat ons "Hepatitis D" (vir "drank") genoem het...
Die seats is die ding waarna ek die meeste uit gesien het, om eerlik te wees. Ekt dit eerste terug gekry voor ons nog klaar was met die bakwerk se skuur, my gat het so gebrand om dit in te sit. Dit het net daar in die kamer gestaan en vir my staar...splitfan wrote:Die seats en wiele is awesome ! kannie wag om die ding aanmekaar te sien nie !
Make a man a fire, and he'll be warm for a day... Set a man on fire, and he'll be warm for the rest of his life 
My beach buggy: viewtopic.php?f=23&t=27695
My beach buggy: viewtopic.php?f=23&t=27695
-
hennels
- Oil Stain
- Posts: 110
- Joined: Tue Oct 02, 2012 9:54 am
- What model do you have?: Beamish
- Location: Cape Town
- Has thanked: 3 times
Re: Bluebird to `GruntY
... and so we started with the biggest nightmare and something I would never have done on my own, the wiring. This took place over a period of about 2 week, could only work in the evenings, as it was done at a friends house.
So it began, the greatest shitstorm of this build...
But 1st, 4 pictures of headlights installed, new flicker lights, body on pan rear view and some wiring to the engine...
Headlights

Flicker lights

Rear view

Engine wiring

General wiring.................
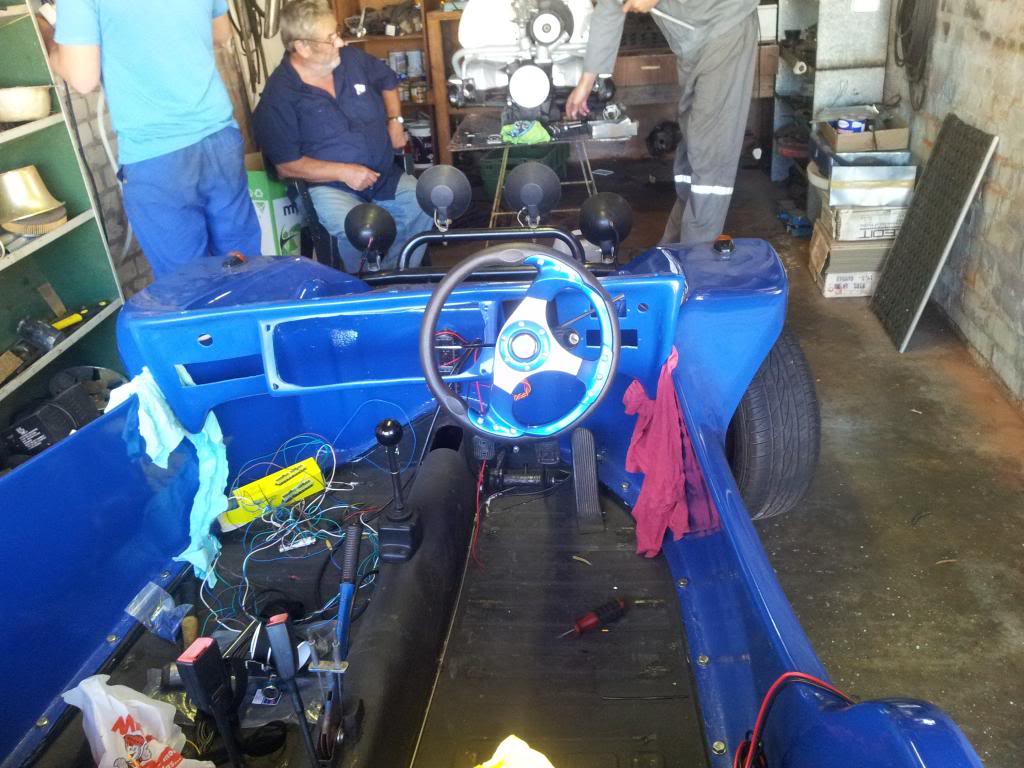


Not a lot of photos here, mostly me lending some moral support and driving to the nearest Midas/Autoelec place to buy supplied (fuses, terminals, flicker unit, relays etc)
We even installed a boost gauge and pumped some air into it for the fun of it... bored in our break

What a mess

Image of the centre console. Dropped the volt meter for a ref counter

More messyness

Even Jaco (little bro) sitting and doing nothing...

Some supplies & tools


Coming together nicely

Neatened underneath the tank area

Doing headlight wiring

MOAR!!!!


Newly rubberised dipped old tank, no more rust, installed

Some neatening up

Just before we completed it with some slinky wrap. Relays valcro'd and fusebox & connector block nicely installed under the dash.

It was time for us to take it back home to get the bonnet on and the rest of the assembly going...
A-framing it back. Was contemplating driving it home, sitting flat on the pan, it was only 3km's away, but dashboard was too loose.
Wiring done! wish it took me the same time as it did writing up this post... a few headaches and swear words later...

1st complete view of the body on PAN with wiring done.


So it began, the greatest shitstorm of this build...
But 1st, 4 pictures of headlights installed, new flicker lights, body on pan rear view and some wiring to the engine...
Headlights
Flicker lights
Rear view
Engine wiring
General wiring.................
Not a lot of photos here, mostly me lending some moral support and driving to the nearest Midas/Autoelec place to buy supplied (fuses, terminals, flicker unit, relays etc)
We even installed a boost gauge and pumped some air into it for the fun of it... bored in our break
What a mess
Image of the centre console. Dropped the volt meter for a ref counter
More messyness
Even Jaco (little bro) sitting and doing nothing...
Some supplies & tools
Coming together nicely
Neatened underneath the tank area
Doing headlight wiring
MOAR!!!!
Newly rubberised dipped old tank, no more rust, installed
Some neatening up
Just before we completed it with some slinky wrap. Relays valcro'd and fusebox & connector block nicely installed under the dash.
It was time for us to take it back home to get the bonnet on and the rest of the assembly going...
A-framing it back. Was contemplating driving it home, sitting flat on the pan, it was only 3km's away, but dashboard was too loose.
Wiring done!
1st complete view of the body on PAN with wiring done.
Make a man a fire, and he'll be warm for a day... Set a man on fire, and he'll be warm for the rest of his life
My beach buggy: viewtopic.php?f=23&t=27695
My beach buggy: viewtopic.php?f=23&t=27695
-
hennels
- Oil Stain
- Posts: 110
- Joined: Tue Oct 02, 2012 9:54 am
- What model do you have?: Beamish
- Location: Cape Town
- Has thanked: 3 times
Re: Bluebird to `GruntY
... we fitted the bonnet just to see how it sits over the petrol tank as it's been moved slightly since the last position before it got put in place with some nuts&bolts

We continued to drill holes in the body for the rollcage


1 hole... done

More PICTARS to continue a bit later...
We continued to drill holes in the body for the rollcage
1 hole... done
More PICTARS to continue a bit later...
Make a man a fire, and he'll be warm for a day... Set a man on fire, and he'll be warm for the rest of his life
My beach buggy: viewtopic.php?f=23&t=27695
My beach buggy: viewtopic.php?f=23&t=27695
-
Loopy

- Oil Cooler
- Posts: 318
- Joined: Fri Dec 25, 2009 8:15 pm
- What model do you have?: Beach Buggy
- Location: Brackenfell, Western Cape
- Has thanked: 11 times
- Been thanked: 6 times
Re: Bluebird to `GruntY
Dit lyk fantasmagories! Respek!
Ps watter grootte was die agterbande wat die buggy opgehad het?
Ps watter grootte was die agterbande wat die buggy opgehad het?
"What I would suggest is that you draw up a project plan and then prioritise the things you NEED to do linked to the budget you have." by Vader
Truer words have never been spoken...
Truer words have never been spoken...
-
piesang
- Oil Cooler
- Posts: 373
- Joined: Tue Apr 19, 2011 12:26 pm
- What model do you have?: 98 buggy
- Location: Grabouw W/cape
- Been thanked: 10 times
Re: Bluebird to `GruntY
dit lyk baie goed, kan darm die verskul sien wanneer 'n painter sy job ken teen oor 'n tuis job met iemand wat nog leer, daai paint is 10/10.
-
Pine
- ACVWSA Junkie
- Posts: 15033
- Joined: Sun Sep 18, 2005 5:54 pm
- What model do you have?: Oil on the driveway
- Location: Wilderness
- Has thanked: 231 times
- Been thanked: 233 times
- Contact:

Re: Bluebird to `GruntY
Jis julle ouens wikkel - dit lyk fantasties! Laat my terugverlang na my projek...
-
piesang
- Oil Cooler
- Posts: 373
- Joined: Tue Apr 19, 2011 12:26 pm
- What model do you have?: 98 buggy
- Location: Grabouw W/cape
- Been thanked: 10 times
Re: Bluebird to `GruntY
begin 'n nuwePine wrote:Jis julle ouens wikkel - dit lyk fantasties! Laat my terugverlang na my projek...
-
buggyfan

- Long Block
- Posts: 2979
- Joined: Wed Mar 12, 2008 2:26 am
- What model do you have?: lwb beachbuggy
- Location: newlands,jhb
- Has thanked: 95 times
- Been thanked: 87 times
Re: Bluebird to `GruntY
Daar is 1 wat al lank wag !!!!piesang wrote:begin 'n nuwePine wrote:Jis julle ouens wikkel - dit lyk fantasties! Laat my terugverlang na my projek...
Sp2+2014
http://www.aircooledvwsa.co.za/viewtopi ... tt#p269451" onclick="window.open(this.href);return false;
-
hennels
- Oil Stain
- Posts: 110
- Joined: Tue Oct 02, 2012 9:54 am
- What model do you have?: Beamish
- Location: Cape Town
- Has thanked: 3 times
Re: Bluebird to `GruntY
Dit was n baie lekker projek, maar dit gaan bietjie meer convincing benodig om vir my sommer gou weer so iets aan te pakPine wrote:Jis julle ouens wikkel - dit lyk fantasties! Laat my terugverlang na my projek...
Baie dankie. Ja, dit is hoekom ek maar die extra paar cent uit gehaal het, en oordat ek nie juis die regte "tools" gehad het vir die job nie.piesang wrote:dit lyk baie goed, kan darm die verskul sien wanneer 'n painter sy job ken teen oor 'n tuis job met iemand wat nog leer, daai paint is 10/10.
Die size op die vorige bande was 295/50/15's BFGoodrich Radial T/ALoopy wrote:Dit lyk fantasmagories! Respek!
Ps watter grootte was die agterbande wat die buggy opgehad het?
arnocill wrote:Ek is mal oor jou seats! Die blou piping en stitching lyk briljant
Besig om nog so paar fotos te upload, sal binnekort die volgende post maak!
Make a man a fire, and he'll be warm for a day... Set a man on fire, and he'll be warm for the rest of his life
My beach buggy: viewtopic.php?f=23&t=27695
My beach buggy: viewtopic.php?f=23&t=27695
-
hennels
- Oil Stain
- Posts: 110
- Joined: Tue Oct 02, 2012 9:54 am
- What model do you have?: Beamish
- Location: Cape Town
- Has thanked: 3 times
Re: Bluebird to `GruntY
Quick update.
We continued to install the cage bar, 1 seat (this is what Ron spoke about, seat hanging skew...) and the back plate where the number plate attaches to. It got dark quick, so we had to move...
It stood like that for about 3 days and I finally had time to work on it again. We needed to tighten the rear bumper as it was only tightened at the shocks and with 2 bolts at the very end of the bars (bottom side). We needed to drill some holes through the joining plate between the 2 arms of the bar (bottom side). Armed with a drill and some very blunt steel drill bits we proceeded. It was a F@CKING nightmare. Bending one, breaking the other, bits of drillbits lying all over the show.
Being almost 9 in the evening, no Midas/Builders or any other hardware shop were open so we continued with this stupid stupid SH!T. At last, after almost an hour and a half or ear deafening sound coming from a blunt drillbits, we got the holes through and bolts tightened. This bumper was not going ANYWHERE.
Some photos.
Admiring the cage bar


We proceeded with the seat passenger seat, notice how it's hanging to the left (facing straight on) This was fixed by a spacer...

The next day, seat still hanging, I wished for it to be straight, but seems like these types of wishes never come true...


We installed the backplate with the old WHITE hinges and pulled it on the ramps to proceed with the bumper tightening.
Unable to get black ones, anyone know of a place? Will take a close up pic of it and attach soon.


The silhouette of that RED beetle giving me some inspiration to work in the night :/ suuuuurrreeeeeee.....


And before we parked it for the night, we tested the lights... TA DA!!!


More photos to come. Enjoy
We continued to install the cage bar, 1 seat (this is what Ron spoke about, seat hanging skew...) and the back plate where the number plate attaches to. It got dark quick, so we had to move...
It stood like that for about 3 days and I finally had time to work on it again. We needed to tighten the rear bumper as it was only tightened at the shocks and with 2 bolts at the very end of the bars (bottom side). We needed to drill some holes through the joining plate between the 2 arms of the bar (bottom side). Armed with a drill and some very blunt steel drill bits we proceeded. It was a F@CKING nightmare. Bending one, breaking the other, bits of drillbits lying all over the show.
Being almost 9 in the evening, no Midas/Builders or any other hardware shop were open so we continued with this stupid stupid SH!T. At last, after almost an hour and a half or ear deafening sound coming from a blunt drillbits, we got the holes through and bolts tightened. This bumper was not going ANYWHERE.
Some photos.
Admiring the cage bar
We proceeded with the seat passenger seat, notice how it's hanging to the left (facing straight on) This was fixed by a spacer...
The next day, seat still hanging, I wished for it to be straight, but seems like these types of wishes never come true...
We installed the backplate with the old WHITE hinges and pulled it on the ramps to proceed with the bumper tightening.
Unable to get black ones, anyone know of a place? Will take a close up pic of it and attach soon.
The silhouette of that RED beetle giving me some inspiration to work in the night :/ suuuuurrreeeeeee.....
And before we parked it for the night, we tested the lights... TA DA!!!
More photos to come. Enjoy
Make a man a fire, and he'll be warm for a day... Set a man on fire, and he'll be warm for the rest of his life
My beach buggy: viewtopic.php?f=23&t=27695
My beach buggy: viewtopic.php?f=23&t=27695
-
piesang
- Oil Cooler
- Posts: 373
- Joined: Tue Apr 19, 2011 12:26 pm
- What model do you have?: 98 buggy
- Location: Grabouw W/cape
- Been thanked: 10 times
Re: Bluebird to `GruntY
vir my het dit weer gegaan oor dit self te doen en al is dit nie perfek nie, het ek baie geleer en sal kyk en hom volgend jaar heeltemal strip en weer oordoen met beter 'tools'hennels wrote:Baie dankie. Ja, dit is hoekom ek maar die extra paar cent uit gehaal het, en oordat ek nie juis die regte "tools" gehad het vir die job nie.piesang wrote:dit lyk baie goed, kan darm die verskul sien wanneer 'n painter sy job ken teen oor 'n tuis job met iemand wat nog leer, daai paint is 10/10.
-
hennels
- Oil Stain
- Posts: 110
- Joined: Tue Oct 02, 2012 9:54 am
- What model do you have?: Beamish
- Location: Cape Town
- Has thanked: 3 times
Re: Bluebird to `GruntY
So the project stood for around 4 days, till weekend, where I could finish it, and was it a fun filled 2 days.
We started with fastening the wind shield. The wind shield housing was also epoxied black and the window install and seal we did ourselves. Came out nicely. So now I had a problem, before we could seal the body/wind shield gap, I needed the metal strip also black:

Kleinboet thinks he's the only 1 that can stand around and do nothing, so I showed him how...

Christo hard at work:

Once the wind shield were installed, we fastened the bonnet so that it can be sealed too:

We set off covering the body for the rattlecan gloss black we would be putting on the silver strip of metal.
Primered up...

Let it dry for some time and black to follow:

After 3 or 4 black coats we let it dry and started on the sidepanels. The U-Bolts tightening the cage bar were sticking out too far pushing the sidepanels away, it had to be cut down to size.

And right hand side DONE:

We continued with the same procedure on the left and got it on chop-chop, with a few "baie lelike woorde" in between.
We needed to take the seat out for the get panel on, nightmare
Both panels installed and the rattle can paint has dried:

We continued to install the 2 seats and admired our work, some more than others...


With the panels on, seats in, wind shield painted (not yet sealed to body) we proceeded with the finer details, STICKERS:

Notice, no hubcaps on the back wheels We could not get it on initially and just left it ... LOL


We played around a bit with locations mostly to show the wife, as she also needed a say in this, RIGHT???
nope

nope

Finally got the right spot

We proceeded with the sticking thereof:

Came out quite NICE

I had 2 of these made and struggled to find a nice place to put it, we decided with this:

We took off the back wheels to get those hubs on, after a NICE polish. Due to the epoxy on the rims, the hubs didn't fit so well so we had to moer them in. Took some sunlight liquid and rubbed it on the side of the caps and took a moerse hammer... That'll teach ya (no pics of this )
)
Hubs in


Wheels back on and tightened with new wheel nuts.


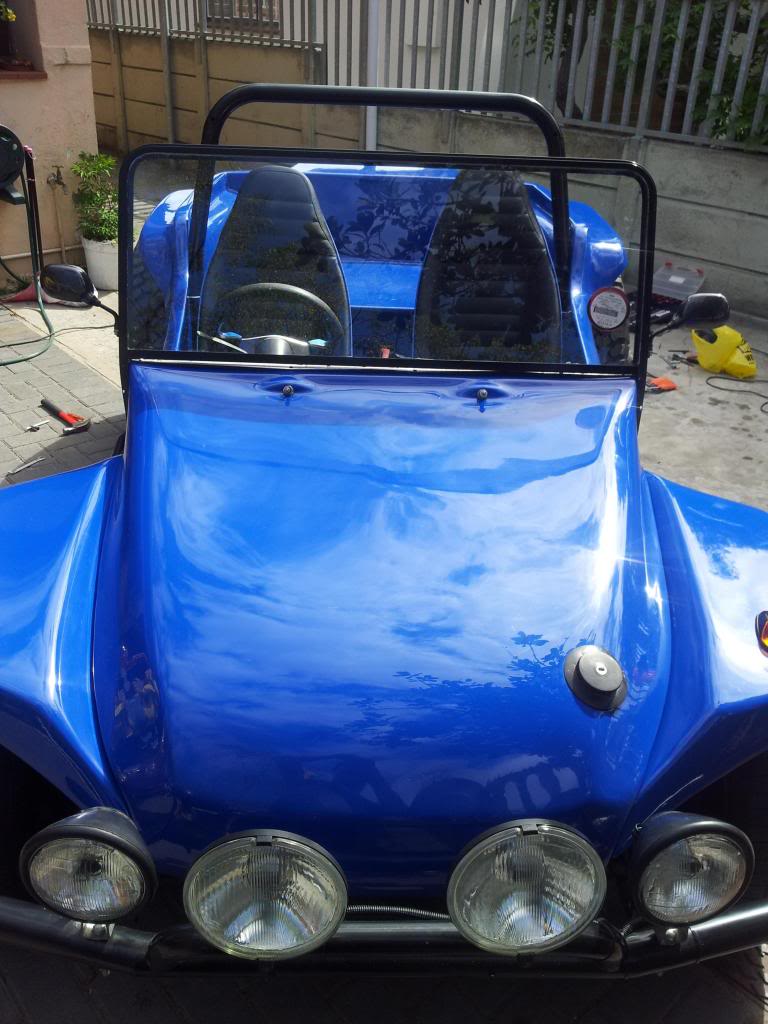
And finally, ladies & gentleman, the finished product (no wipers, 1st needed to seal wind shield)
Sexy backside

Inside (handbreak lever to be replace SOOOOON)

Front

and 1 with me (hennie)

The day hereafter we sealed the wind shield to body (bad pictures):


Hoop julle manne het dit geniet om saam te lees, soos wat ek dit geniet het om dit te "her-bou"
Ek sal nog so paar photos opsit van ons Sondag run.
We started with fastening the wind shield. The wind shield housing was also epoxied black and the window install and seal we did ourselves. Came out nicely. So now I had a problem, before we could seal the body/wind shield gap, I needed the metal strip also black:
Kleinboet thinks he's the only 1 that can stand around and do nothing, so I showed him how...
Christo hard at work:
Once the wind shield were installed, we fastened the bonnet so that it can be sealed too:
We set off covering the body for the rattlecan gloss black we would be putting on the silver strip of metal.
Primered up...
Let it dry for some time and black to follow:
After 3 or 4 black coats we let it dry and started on the sidepanels. The U-Bolts tightening the cage bar were sticking out too far pushing the sidepanels away, it had to be cut down to size.
And right hand side DONE:
We continued with the same procedure on the left and got it on chop-chop, with a few "baie lelike woorde" in between.
We needed to take the seat out for the get panel on, nightmare
Both panels installed and the rattle can paint has dried:
We continued to install the 2 seats and admired our work, some more than others...
With the panels on, seats in, wind shield painted (not yet sealed to body) we proceeded with the finer details, STICKERS:
Notice, no hubcaps on the back wheels
We played around a bit with locations mostly to show the wife, as she also needed a say in this, RIGHT???
nope
nope
Finally got the right spot
We proceeded with the sticking thereof:
Came out quite NICE
I had 2 of these made and struggled to find a nice place to put it, we decided with this:
We took off the back wheels to get those hubs on, after a NICE polish. Due to the epoxy on the rims, the hubs didn't fit so well so we had to moer them in. Took some sunlight liquid and rubbed it on the side of the caps and took a moerse hammer... That'll teach ya (no pics of this
Hubs in
Wheels back on and tightened with new wheel nuts.
And finally, ladies & gentleman, the finished product (no wipers, 1st needed to seal wind shield)
Sexy backside
Inside (handbreak lever to be replace SOOOOON)
Front
and 1 with me (hennie)
The day hereafter we sealed the wind shield to body (bad pictures):
Hoop julle manne het dit geniet om saam te lees, soos wat ek dit geniet het om dit te "her-bou"
Ek sal nog so paar photos opsit van ons Sondag run.
Make a man a fire, and he'll be warm for a day... Set a man on fire, and he'll be warm for the rest of his life
My beach buggy: viewtopic.php?f=23&t=27695
My beach buggy: viewtopic.php?f=23&t=27695
-
splitfan
- Carburettor
- Posts: 1966
- Joined: Fri Jul 20, 2007 1:23 pm
- What model do you have?: 56,71,75
- Location: Port Shepstone KZN
- Has thanked: 46 times
- Been thanked: 26 times
- Contact:
Re: Bluebird to `GruntY
Good job ! the buggy looks awesome !
My biggest fear is that my wife sells my cars for what i told her they cost !!