'71 Westy Project - Maiden Voyage!!

Give details and pictures of your ACVW projects here.
smashcat
Oil Leak
Posts: 68
Joined: Thu Feb 01, 2007 11:36 am
Location: Cape Town

Re: '71 Westy Project - Update

Post by smashcat »

Almost a year since the last update! You know that a project is taking too long when the stuff you originally restored needs to be restored again and the project is not even half way!!! :oops:

I finally took a few days off where I wasn't going away, racing, doing home repairs or attending to one of the many other things that seem to always take preference. So at last the Westy received some attention.

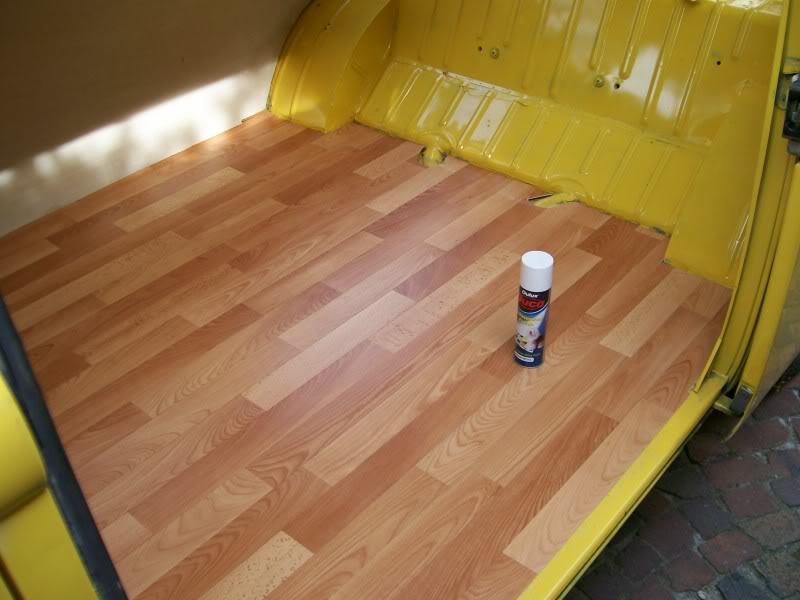
First up was a thorough cleanout and liberal coats of rust convertor to the floor (no actual rust, just a few bare metal patches). Then two layers of masonite board topped off with a piece of Novilon flooring in "strip wood" look.

Image

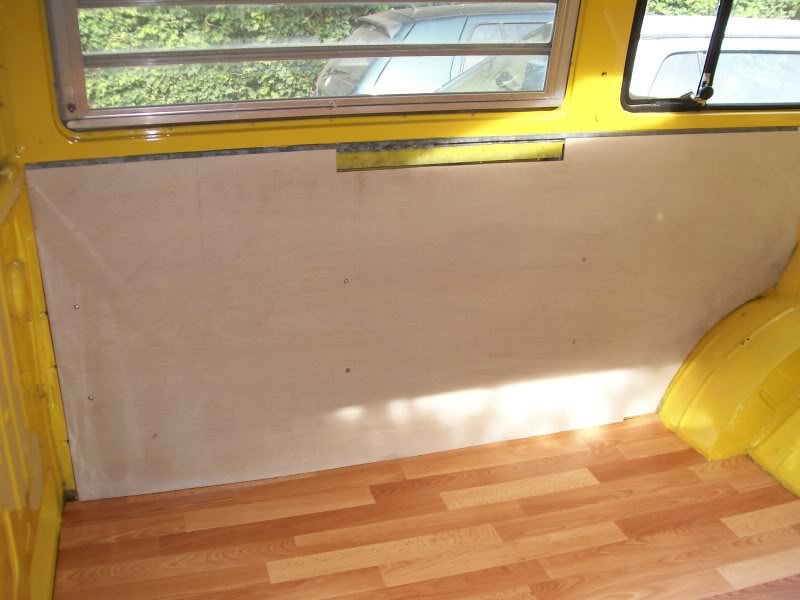
Next up was a new side interior panel. I'm using 2mm ply which I've "lime-washed" with diluted light cream pva covered with a satin sheen, water based, clear varnish to try and match the original panels; some of the better condition ones will be retained. The new panel looks "old" and blends in pretty well with the others.

Image

Then a really fiddly job (for a first timer that is); fitting the passenger door window and winder mechanism. Damn, it took me several tries as I kept getting the order of fitting wrong. I'd get half way then realise that some other bit was not going to fit as it needed to be fitted first! Anyway, got it right eventually and its in and working perfectly. I gave the inside of the front doors a good clean out, painted with rust converter and sprayed on a layer of wax. Also checked that all drain holes were unblocked. Unfortunately the window rubbers, while complete, are very brittle and are not doing a great job of keeping water out of the doors so I put extra effort into preventative measures. Sorry, no pics; I was struggling too much to think of photos.

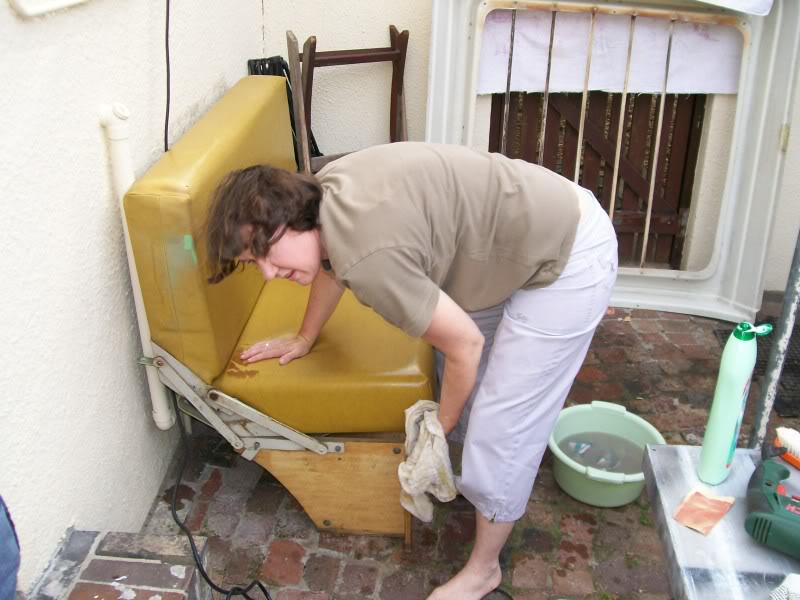
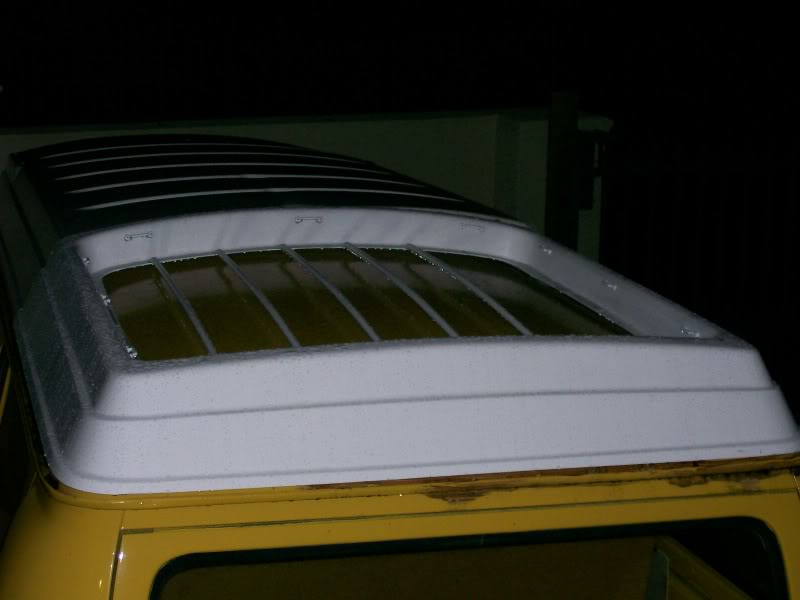
Next up was the rear half of the pop-top: the roof rack bit. Several of the bars were loose and it needed a spray as it wasn't done properly at the time of the original spray job. A few nuts and bolts later plus two cans of white Duco spray and it looked good as new. While I was busy with that I managed to get the better half onto the job of cleaning the rock and roll bed (after all, cleaning is woman's work :P :P ). It is amazing what a good scrubbing can do, to the seat that is, not the wife. It looks almost new. Some slip covers of a more modern material are planned for later but for now it looks pretty good.

Image

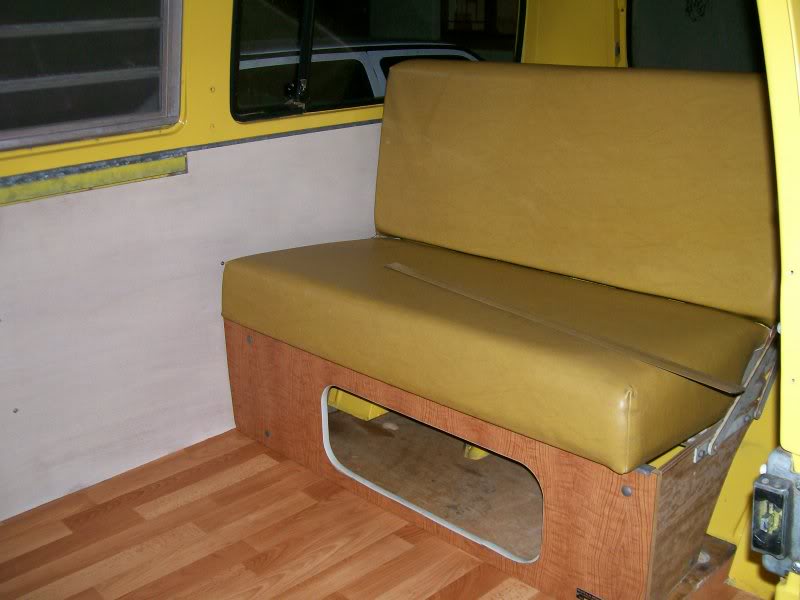
Put the seat in place temporarily to get the "feel" of what it's going to be like once in place permanently. (Also realised I needed a few more holes cut out of the new floor for bed's retaining bolts.)

Image

When it was time to fit the roof section I found that the guys who had sprayed the bus had not removed the old rusty screws that originally held the section down. They had ground them off flush with the metal. :shock: :x I then proceeded to break two drill bits and blunt a few more drilling out the remains. A few new rubber door stops were used to replace the spacers for the back section and it was done. The van now looks a lot better with a complete roof. Excuse cr@ppy photo taken in the dark.

Image

Thats all I've managed this week. Work finished yesterday as I had tickets to Newlands for the Stormers/Brumbies game. Today was lousy weather and anyway, the post match celebrations involved copious quantites of Jack Daniels so the day was spent recovering. :lol:

Hopefully the next update will be sometime BEFORE May 2009. :P
smashcat
Oil Leak
Posts: 68
Joined: Thu Feb 01, 2007 11:36 am
Location: Cape Town

Re:

Post by smashcat »

Pierre wrote:Where is your shipping point in the States?
Pierre, appologies for the lack of reply - its only a year late! :P :lol: :oops:

Things have changed a bit and shipping from the States is not so easy or frequent anymore. Most of our stuff now comes from France and getting "extras" into the containers is a logistical nightmare.
Blitzkrieg
ACVWSA Junkie
Posts: 10784
Joined: Wed Mar 07, 2007 10:41 am
What model do you have?: none
Location: Johannesburg
Has thanked: 91 times
Been thanked: 44 times

Re: '71 Westy Project - Update

Post by Blitzkrieg »

Nice work!Luckily this forum doesn'y post shed in the projects thread, you would have been in a spot of bother :P

BTW, I'm still interested in that Cobra Monaco :)
vuyo
Exhaust Pipe
Posts: 1709
Joined: Tue Jan 16, 2007 9:47 am
What model do you have?: beetle
Facebook: vuyo dube
Location: cape town
Been thanked: 1 time

Re: '71 Westy Project - Update

Post by vuyo »

gooooooooooooooooooood job!!!!
smashcat
Oil Leak
Posts: 68
Joined: Thu Feb 01, 2007 11:36 am
Location: Cape Town

Re: '71 Westy Project - Update

Post by smashcat »

Blitzkrieg_Beetle wrote:Nice work!Luckily this forum doesn'y post shed in the projects thread, you would have been in a spot of bother :P

BTW, I'm still interested in that Cobra Monaco :)
Too right!! Stay tuned for the next exciting update .................... in 2025. :D

On the Cobra, promises promises! :P :P
smashcat
Oil Leak
Posts: 68
Joined: Thu Feb 01, 2007 11:36 am
Location: Cape Town

Re: '71 Westy Project - Update

Post by smashcat »

vuyo wrote:gooooooooooooooooooood job!!!!

Thanks Vuyo. 8)
calooker
Donor
Donor
Posts: 4973
Joined: Wed Sep 14, 2005 9:24 am
What model do you have?: 77 SP
Location: Johannesburg
Has thanked: 5 times
Been thanked: 98 times
Contact:
Portugal

Re: '71 Westy Project - Update

Post by calooker »

Better floor than I have @ home :D
flatfourfan
Full-time Bug Nutter
Posts: 4195
Joined: Tue Nov 08, 2005 12:06 pm
What model do you have?: Speedster Replica
Location: Pretoria
Has thanked: 36 times
Been thanked: 50 times

Re: '71 Westy Project - Update

Post by flatfourfan »

I dig the floor.
calooker
Donor
Donor
Posts: 4973
Joined: Wed Sep 14, 2005 9:24 am
What model do you have?: 77 SP
Location: Johannesburg
Has thanked: 5 times
Been thanked: 98 times
Contact:
Portugal

Re: '71 Westy Project - Update

Post by calooker »

BTW nice to see you put the wife to good use :whip:
smashcat
Oil Leak
Posts: 68
Joined: Thu Feb 01, 2007 11:36 am
Location: Cape Town

Re: '71 Westy Project - Update

Post by smashcat »

Bump just to keep thread alive.

Nothing has happened since the last update but I'm on leave for 2 1/2 weeks from mid this month (longest leave I've taken in 10 years) and will definitely get some more work done.
smashcat
Oil Leak
Posts: 68
Joined: Thu Feb 01, 2007 11:36 am
Location: Cape Town

Re: '71 Westy Project - Update

Post by smashcat »

Sometimes it takes a definite deadline to get things moving. A friend called me a couple of weeks ago to tell me that he and another friend were going to take their splitty's to the King Of The Mountain hill climb on the 29th and 30th of this month. He knew that this would be just the incentive I needed to get the bus project revitalised. So the wife and I have dedicated just about every evening for the last 2 weeks to working on the camper. Mainly small bits and pieces and cleaning, more cleaning and even more cleaning. Its amazing how much dirt accumulates over 37 years! I stripped the headlights and, as a temporary measure, sanded down the badly rusted surfaces of the reflectors then sprayed with mirror chrome. Not ideal but with a new set of bulbs they actually work quite well. I just hope the heat doesn't set fire to the paint. :shock: :P All the tail lights and brake light bulbs changed and checked. Stripped down the water bottle and the little hand pump as it wasn't working. Found that the o-ring on the plunger was totally knackered. Where can I get one of these? Anybody got one I can buy? Offending item below:

Image

Cut out two new pieces of ply for the door panels. I have one good(ish) vinyl door card cover for the passenger door but the one for the driver's side is beyond salvage. Again, anyone out there with a couple of kombi door panels they want to sell? Various inner trims, hinges, buttons, knobs, thiga-ma-jigs fixed and fitted. Then I decided it was time to send the camper off to the experts for the bits I couldn't (or didn't want to) check for myself. Even driving it the few km's from Rondebosch to Ottery told me that I was doing the right thing. It was a nightmare to drive. 24 hours after dropping it off at Volksie World I got a phone call to say that the quote was ready. I was expecting R5k to R6k so I nearly had a heart attack when I was told it would come to R14k. :shock: Admittedly, I did tell them to go through the bus from one end to the other and quote on anything mechanical that affected safety or reliability. After a few ciggies and a strong cup of coffee to calm the nerves I went round to see the exact details. Well, the list was comprehensive and included: Ball joints, gear linkage bush kit, engine mounts, brake system overhaul (front and back), centre pin, full engine service, four new shocks, and many other small items too numerous to list right now. After explaining to Clifford that R14k was way out of my budget, we went through the list and took out as many "no-essentials" as we could. Things like shocks (they're a bit worn but not deadly), skimming of discs, new pads (they're only just below half) and so on. But it's still going to set me back R10k. At least it should now be a driveable and useable vehicle, which, after-all, is what it should be. So today, having no vehicle to actually work on, I decided to refurbish (in my inexperienced way) the front bumper which is still in my possession. I have discovered the joys of Nitromors. Man, that is cool stuff!

Nitromors is your friend!

Image

Effortless paint removal, and fun too! :lol:

Image

All taped up and primered.

Image

Final product with two coats of Aluminium look spray paint.

Image

This may not seem very exciting to the experienced diy'er but to a noobie such as me this was cool! It turned out even better than I hoped. The bus will be back on Wednesday so Wed, Thur and Fri nights are going to be long ones doing the final fitting of the interior and the 1000's of other things that still need doing. And then Saturday its time for the first trip!!! Damn, I'm like a kid with a new toy! :lol:
Blitzkrieg
ACVWSA Junkie
Posts: 10784
Joined: Wed Mar 07, 2007 10:41 am
What model do you have?: none
Location: Johannesburg
Has thanked: 91 times
Been thanked: 44 times

Re: '71 Westy Project - Update 23/11/08

Post by Blitzkrieg »

What brand of aluminium look paint did you use on that bumper?
If it's too low, you're too old :twisted:
User avatar
Dutch_Diver
Full-time Bug Nutter
Posts: 4028
Joined: Tue Nov 20, 2007 8:52 am
What model do you have?: 64 bus & 63 Bug
Facebook: www.facebook.com/people/Frank-Van-Hoof/576686903
Location: St Ives, Dorset, UK
Been thanked: 10 times
Contact:

Re: '71 Westy Project - Update 23/11/08

Post by Dutch_Diver »

Looking very nice.
"MO" - 1965 Splitscreen bus --> http://www.aircooledvwsa.co.za/viewtopi ... =37&t=9305" onclick="window.open(this.href);return false;
"BOBBIE" - 1963 Beetle --> http://www.aircooledvwsa.co.za/viewtopi ... 23&t=11338" onclick="window.open(this.href);return false;
smashcat
Oil Leak
Posts: 68
Joined: Thu Feb 01, 2007 11:36 am
Location: Cape Town

Re: '71 Westy Project - Update 23/11/08

Post by smashcat »

Blitzkrieg wrote:What brand of aluminium look paint did you use on that bumper?
Its some Amerrican brand that I can't remember for the moment but will look tonight. Bought it at Builders Warehouse, it's a rust inhinibitor, nice spray action but not cheap.
smashcat
Oil Leak
Posts: 68
Joined: Thu Feb 01, 2007 11:36 am
Location: Cape Town

Re: '71 Westy Project - Update 23/11/08

Post by smashcat »

Some R14k later, I have a bus that is now driveable with only a few minor technical issues to sort out. I got the bus back on Wednesday, week before last, and we were due to leave for Ceres and the KOTM on Saturday morning. All the interior furniture had been loosely fitted for trial purposes but removed for its visit to the workshop. Things to do (in one day!) included fitting all furniture, front roof panel, hang curtains, fit front bumper, fit door panels, hook up some music, and 1000 small bits and pieces. There was only one thing for it - call in sick on Friday :P .

I starteded working at 9.00am and 13 hours later collapsed in an exhausted heap with plenty of small jobs left undone but all the major work sorted! The original plan had been to leave at sparrow-fart on Saturday morning for Ceres and find a spot on the hill to watch the racing. Fortunately, common sense prevailed and it was decided earlier in the week to leave at a more respectable 10.00am and take a slow drive through to Tulbagh and give the Saturday KOTM a miss. We booked a great little camping site on Wild Olive Farm just outside Tulbagh. I was joined on this maiden voyage by a couple of mates, one in his project 1967 German Split (mechanically sorted, mostly) and another in his newly aquired 1969 bay transporter/camper which he had only aquired a couple of weeks earlier. It was in pretty rough condition except for the fully reconditioned engine he'd just fitted. According to him, the bus had been standing for 87 years when he found it and was completely encrusted in various moulds, fungi and moss which he literally had to use a paint scraper to remove.

Well, the trip up was sloooooooooooow. I couldn't get more than 90km/h out of the bus and 50km/h up evn modest hills. The motor was running fine but just seemed very underpowered. OK, it's only a 1600 and my boet and I are not the smallest guys around but this was ridiculous. Both the other busses were also running 1600's and not struggling so it was pretty obvious that something wasn't right. Later, at the camp site, after a few ales we decided to check it out and found that the accelerator linkage (just under the floor) was so badly worn and buckled that I was only getting half throttle! :( A bit of re-shaping and adjusting and the best we could get was 3/4 throttle but it now idles at 2000rpm - a small price to pay for a few extra ponies. Other than that a few other minor niggles that need to be sorted, the bus was a pleasure and well worth all the time and money. The project is far from finished (is it ever finished?) but for now she is a useable, respectable looking fun vehicle.

Some random pics from the weekend.

Roadside stop
Image

The '69 van
Image

The splitty
Image

The camp, roof up, Westy tent up.
Image

Kamp Kombi
Image

Ready for bed
Image

Satyurday evening was spent eating, drinking and socialising. The wind was howling and all four of us ended up sitting in the Westy tent with the fire just outside the door and a bottle of Jack's finest for interior warmth. The bus was warm and comfortable to sleep in which is more than can be said for my boet who was sleeping in a tent. We had not expected it to be so cold and the poor guy nearly froze but, brother or not, I wasn't sharing the "double" bed with him! :twisted:

After a greasy fry-up on Sunday to soak up the residue of the previous evening's indulgences we took a leisurely cruise over the pass into Ceres. The wind was howling in the camp-site and freezing cold. Over the pass in Ceres, just a few km away, it was still and hot as hades. Weird. I am sure some of you have read about the disastrous KOTM. Well, after standing in the baking sun for nearly 3 hours and still about 200th in the queue for the busses up the hill we called it quits. It was R100 down the tubes but fortunately the weekend had been more about the vans than the KOTM anyway. So we headed off back to Cape Town stopping for a late lunch on the way. Altogether, a very pleasant journey and hopefully the first of many.
Post Reply