Page 2 of 6
Re: 66 Feuerwehr Project
Posted: Fri Oct 29, 2010 10:33 pm
by karmakoma
Bugger, it's the same one as in your 301203 pic. Found it in gateway shopping centre.
Walked past the store and just couldn't leave it there. The toyshop downstairs also had a few nice maesto models. Will post some pics once we get home.
Re: 66 Feuerwehr Project
Posted: Sat Oct 30, 2010 7:33 am
by Bugger
Need some help
What should the color scheme be of the rims
Black with white caps
White with red caps and vw logo insert painted white
Red with white caps and logo painted red ?
Re: 66 Feuerwehr Project
Posted: Sat Oct 30, 2010 9:15 am
by Muderick
Something like this Pierre...
Re: 66 Feuerwehr Project
Posted: Sat Oct 30, 2010 1:45 pm
by beetlefanatic
Bugger wrote:.....
You are actually the right guy to check for me in the UK for one of those Rotating Blue Lights
If you could find me one of those for a good price that would be very good news.
One for me too please Dutch!

I'm thinking of turning the green bus into a german police support vehicle. Something like this.
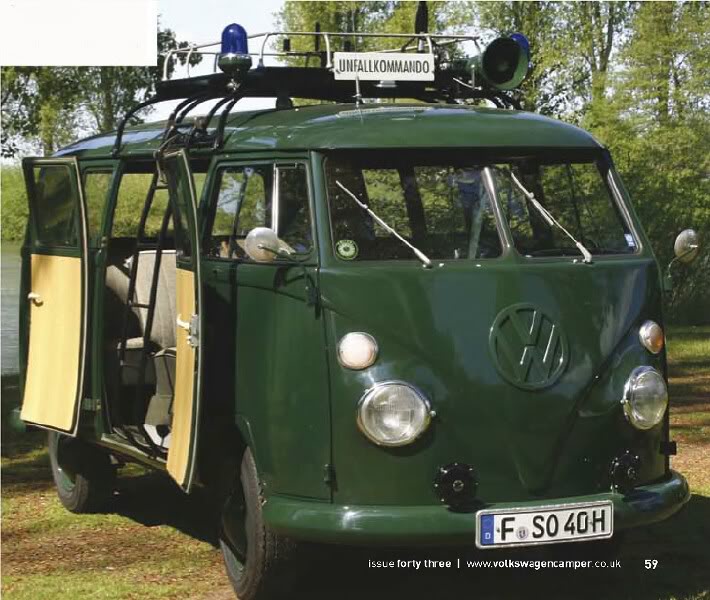
Looking at that pic I might need 2.
Re: 66 Feuerwehr Project
Posted: Sat Oct 30, 2010 2:45 pm
by 69bug
Good luck with the project. Will be following it closely!
Re: 66 Feuerwehr Project
Posted: Sun Oct 31, 2010 8:59 pm
by Bugger
beetlefanatic wrote:Bugger wrote:.....
You are actually the right guy to check for me in the UK for one of those Rotating Blue Lights
If you could find me one of those for a good price that would be very good news.
One for me too please Dutch!
I'm thinking of turning the green bus into a german police support vehicle. Something like this.
Looking at that pic I might need 2.
BF your are a lot closer to finish than mine your one has already the color I still got to climb a mountain
Re: 66 Feuerwehr Project
Posted: Wed Nov 03, 2010 8:22 pm
by Bugger
Here is the diaghram of the rotiseri
They say on the plans 23inc and 30deg
I cut my steel to 584mm and cut the ends 15 deg to get the desired 30 deg but it does not work out
Could any one help a confused bugger

279908.jpg
Step one: Build a 30 degree jig out of 2 x 2 angle iron; Weld the two 23 inch angle iron sections (long point to long point) with 15 degree cuts @ a perfect 30 degree angle. To verify true degree reference length of A sq. + B sq. = C squared.
Step two: Cut your 0.23622047 decimal inch wall thickness 2" x 2" tubing @ 15 degree cuts to length. Mark all lengths, 21 inches and 23 inches. (Please see foot note). Pair the correct to plans sections in two, double check and make minor adjustments if needed. Break the rotisserie into a top and bottom, each should share parallels angles and one side. Using Jig, weld pairs, then weld pairs together. Now you have a complete multigon making a 360 degree circle, I.E. 12 30 degree angles make 360 degree multigon. Repeat this step for second multigon.
Step three: Cut your multigon "B" to a top and bottom, note location to plans. Insert "b" solid stock in bottom half and weld in place @ all four locations. Slide top half of multigon back in place and drill out a hole for a holding pin. Remove top half.
Step four: Weld "A" in place. Note "a" (receives a 2 inch x 2 inch tubing)
Step five: Make your mounting bracket arms and plates. Mount the plate's (flat 1/2" steel plate) in place on your vehicle, and get ready for some muscle work. Slide the arms in place on the multigon. Raise the vehicle to center point of gravity. Raise the bottom half multigon with all in place, steady the bottom half w/ tack welded temporary stabilizer. Weld the arms "C & D" to the 1/2 plate that is bolted on your bus. Note: the bracket arms should be removable from the "A" pockets. Note: "c & d" were designed for barndoor bus, when building rotisserie for non barndoor; mount plates in place and correct the dimension width on arms prior to welding. Allow 1/2 inch of total play.
Step six: Build a safety bar. See jpg. This is very important. You don't want the bus rolling back on your ass or squashing your precious hands! Please note safety bar jpg. Use this bar.
Step seven: Lift the top half's of the multigon's in place and safety pin. Roll that bus over, safety bar the position and fix that nasty rust to factory standards. If its worth doing, do it right!
Foot note: 21 and 23 inch length's can all be changed to 23 inches. This will simplify the layout but make the overall height taller and you should consider the height of your garage opening prior to making this change.
This is how it is supposed to look
279909.jpg
431759.jpg
So Any Engineers here on site who can re draw the plans to South Africa speck
Re: 66 Feuerwehr Project
Posted: Wed Nov 03, 2010 9:09 pm
by Dawie
Do you mean that the 30 deg/ 15 deg angles do not work out?
I would think that, if you consider a normal right angle cut as 90 degs, it will have to be 90-15 deg = 75 degrees cuts.
All 12 sections should obviously be exactly same length. Then the "multigon" shape should always work out- 360 degs divide by 12 stays 30 degs. 30 Degs divide by two is 15deg.
If all 12 sections were for instance much shorter, the "multigon" would still work out, but it would be like a scale model and too small for kombi to fit inside.
If you lay the 12 pieces out on a flat floor before tackwelding: Make sure that all opposing pieces are parallel to each other. They should also be equidistant. Like use a tapemeasure, have a helper and walk around "multigon", doing little adjustments until all distances are the same.
Obviously clamp some support across during welding to prevent it pulling skew from the heat.
Re: 66 Feuerwehr Project
Posted: Wed Nov 03, 2010 9:26 pm
by Bugger
Dawie wrote:Do you mean that the 30 deg/ 15 deg angles do not work out?
I took the end piece of the 50x50 used a angle finder and small square then moved it to 75 degrees on the angle finder then it is supposed to give me the 15degrees I am looking for so I thought ?
I would think that, if you consider a normal right angle cut as 90 degs, it will have to be 90-15 deg = 75 degrees cuts.
This is what i done
All 12 sections should obviously be exactly same length. Then the "multigon" shape should always work out- 360 degs divide by 12 stays 30 degs. 30 Degs divide by two is 15deg.
Each end of the 50x50 were cut 15 deg to give me my desired 30 degrees as the plans were explained but it just does not work
Or my angles are out completely
If all 12 sections were for instance much shorter, the "multigon" would still work out, but it would be like a scale model and too small for kombi to fit inside.
Exacataly
If you lay the 12 pieces out on a flat floor before tackwelding: Make sure that all opposing pieces are parallel to each other. They should also be equidistant. Like use a tapemeasure, have a helper and walk around "multigon", doing little adjustments until all distances are the same.
This is what I tried but then the angles that I cut were wrong?????
Have to take pics
Obviously clamp some support across during welding to prevent it pulling skew from the heat.
Re: 66 Feuerwehr Project
Posted: Wed Nov 03, 2010 9:55 pm
by hitlers revenge
Bugger , Dawie
Look at the drawing, THE LENGTHS ARE NOT THE SAME.
The verticals and horizontals are 23 inches in length while the pieces between the verticals and horizontals (2 between each) are only 21 inches in length.
Hope this helps
Re: 66 Feuerwehr Project
Posted: Wed Nov 03, 2010 10:04 pm
by Dawie
Would think that as long as it is symmetrical, it should work out.
If every second one is the same length, (like a 21 followed by a 23 followed by 21 followed by 23 etc)
Or all the same length,
Both ways should work.
As a test,
You could hold 2 pieces end to end as they were cut,
Then see if angle is 30 deg/ 150 deg,
If you were to lay 4 pieces on the ground,
End to end as they were cut,
First and last piece should be 90 degs in relationship to each other, like in your sketch.
Re: 66 Feuerwehr Project
Posted: Wed Nov 03, 2010 10:14 pm
by Bugger
Thanks Dawie
I am going to get a better angle measuring tool tomorrow and check my angles and take some pics
So you guys can see what it came to at the moment
Well I at least finished my car trailer today and got it serviceable as it was out of action for about 1 1/2 years as I desided I am not going to fix as every one borrowing it just stuff's it up
But I was the one also suffering due to not fixed
I built new 2m long loading ramps that slide in and out of the trailer , fitted a jockey wheel with adjustment and new tyres so tomorrow I can go and get my split bus at the previous sand blasting guys and have a 2nd go at the Rotisserie as I want the bus on the rotisserie when it goes for Sand blasting then there is no excuse as why the bus can not be done 100% everywhere especially at the bottom of the bus
Re: 66 Feuerwehr Project
Posted: Wed Nov 03, 2010 11:17 pm
by lowlight
Angles inside are 150 degrees(75x2). 2 lengths iron are not enough. Check on my 63 DC in projects something simmilar.
Re: 66 Feuerwehr Project
Posted: Thu Nov 04, 2010 11:04 am
by Tiger0107
I think I will also need a rotiseri.. makes life a whole lot easier when working on the van..
It looks so simple to make in the diagram but it not as easier from the sounds of it........
Re: 66 Feuerwehr Project
Posted: Thu Nov 04, 2010 9:38 pm
by Bugger
Well ok I found the problem
The protractor I used the first time had a problem where the indicator was located with the result that I had a 23degree cut on the first 7 pieces that I cut
After buying a new protractor today and regrouping

I set it on the desired 15degrees and marked all the 24 pieces and cut them to the 15 degree angles.When I bought the steel I got them all cut to 584mm(23inches) and Yes one needs 3 lengths of 50x50 you get 10x584mm pieces out of a 6m length and 4 out of the 3de and the rest is for the stopper brace that is left
After cutting I laid the first 12 pieces out on the ground and used the protractor and tack welded it together
After the first 6 pieces I could start measuring and Make sure that all opposing pieces are parallel to each other. They were also equidistant as Dawie has explained .

Then tack-welded them together and it actually went quick with out a jig I just used the protractor the get my 60 degree with them laying next to each other
Start of the 2nd try
Rotiserie 1.jpg
Here both are tackwelded and waiting full welding treatment
rotiserie 2.jpg
I am thinking of getting thin rubber to glue on to the outer edges when the bus gets rolld around for stability that it does not slide all over the floor when pressure is applied
To the FIG what engin valances are these are they German or fleetline and if fleetline will one work on the 66 German of mine
split bus engine valance.jpg