Continued with stripping and have now gone right around up to the windows.
Also tried to better the rear hatch which had quite a bit of body putty on. Now not so bad anymore. Will try to flatten it even more.
Engine hatch was sandblasted as it is small enough to fit into my cabinet. Now I need to touch it up and get it ready for paint. Oh, the holes for number plate holders were closed except for the ones being used.
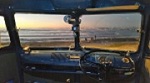
Also found a cigarette lighter which has no place on my dash yet. Before I cut a hole and fit it I want to make sure it is in the right place and if there is an original somewhere.
Any comments regarding placement? I know I can place it anywhere I want, but there might be a valid reason not to.
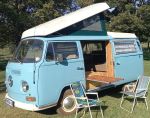
'70 Westfalia Project
-
AlanH
- Crankshaft
- Posts: 763
- Joined: Thu Jan 17, 2013 7:20 am
- What model do you have?: '70 Westy
- Location: Pretoria
- Has thanked: 125 times
- Been thanked: 86 times

Re: '70 Westfalia Project
You do not have the required permissions to view the files attached to this post.
Wanted parts:
Left sunvisor
Sink faucet
Exhaust to swap for Beetle exhaust
Left sunvisor
Sink faucet
Exhaust to swap for Beetle exhaust
-
ClassicVolks
- Drip
- Posts: 12
- Joined: Wed Apr 29, 2020 2:29 pm
- What model do you have?: Beetle
- Location: Pretoria
- Has thanked: 1 time
- Been thanked: 5 times

Re: '70 Westfalia Project
Great progress Alan. I envy your skill set by being able to do so much body work yourself.
Not sure about the cigarette lighter. I trust the Kombi experts will be able to advise you better.
Not sure about the cigarette lighter. I trust the Kombi experts will be able to advise you better.
-
sean

- Transmission
- Posts: 2402
- Joined: Sun Aug 03, 2008 8:51 pm
- What model do you have?: Bays & Splits
- Location: Somerset West
- Has thanked: 63 times
- Been thanked: 227 times
Re: '70 Westfalia Project
Hi Alan. I have never seen a cigarette lighter in a kombi dashboard.
If you really want one installed, I would rather suggest using a under dash mount lighter, then you won’t have to drill holes.
If you really want one installed, I would rather suggest using a under dash mount lighter, then you won’t have to drill holes.
-
Pine
- ACVWSA Junkie
- Posts: 15033
- Joined: Sun Sep 18, 2005 5:54 pm
- What model do you have?: Oil on the driveway
- Location: Wilderness
- Has thanked: 231 times
- Been thanked: 233 times
- Contact:

Re: '70 Westfalia Project
I'd also rather go for an under dash fitment, see this thread:sean wrote: Sun May 17, 2020 6:09 am Hi Alan. I have never seen a cigarette lighter in a kombi dashboard.
If you really want one installed, I would rather suggest using a under dash mount lighter, then you won’t have to drill holes.
https://www.thesamba.com/vw/forum/viewt ... p?t=310720
-
retrovan
- Donor

- Posts: 8710
- Joined: Mon Feb 07, 2011 8:51 pm
- What model do you have?: 52T1,68FB,72Bay,75FL
- Location: Eich! no, in Jefferys Bay
- Has thanked: 421 times
- Been thanked: 541 times
- Contact:
Re: '70 Westfalia Project
The other option would be to fit it into your Glovebox,
then your phone and toys can charge while been out of sight.
Herman
then your phone and toys can charge while been out of sight.
Herman
1952 Split Beetle 1835cc
1968 Fastback 2Lt.type4
1972 Low Light Bay Panel Van 2Lt type 4
1975 Fleetline Panel Van 1914cc
2020 MeFusco Beetle Truck 2Lt type 4
1972 FT Hahn SP 1776 cc
1968 Fastback 2Lt.type4
1972 Low Light Bay Panel Van 2Lt type 4
1975 Fleetline Panel Van 1914cc
2020 MeFusco Beetle Truck 2Lt type 4
1972 FT Hahn SP 1776 cc
-
AlanH
- Crankshaft
- Posts: 763
- Joined: Thu Jan 17, 2013 7:20 am
- What model do you have?: '70 Westy
- Location: Pretoria
- Has thanked: 125 times
- Been thanked: 86 times
Re: '70 Westfalia Project
Thanks guys,
I have been convinced. Strange that there would be an ashtray but no lighter.
Anyway under the dash it will go and seeing I was going to fit USB sockets under dash anyway this will be a unit.
I have been convinced. Strange that there would be an ashtray but no lighter.
Anyway under the dash it will go and seeing I was going to fit USB sockets under dash anyway this will be a unit.
Wanted parts:
Left sunvisor
Sink faucet
Exhaust to swap for Beetle exhaust
Left sunvisor
Sink faucet
Exhaust to swap for Beetle exhaust
-
AlanH
- Crankshaft
- Posts: 763
- Joined: Thu Jan 17, 2013 7:20 am
- What model do you have?: '70 Westy
- Location: Pretoria
- Has thanked: 125 times
- Been thanked: 86 times
Re: '70 Westfalia Project
So today was spent experimenting with rust removers.
What I can tell you is that they are all ok to remove rust, but once you rinse with water you immediately get flash rust i.e. golden shimmer on the new surface. What do you do to prevent that?
Well eventually I used Deoxidene, left it on for about 15 min. and then rinsed and immediately blow dry with compressed air. That seems to work.
Even better though is once you have sandblasted your parts, just clean them with Acetone ot the like and paint etch primer over that.
Interestingly, I had two washers of body metal which I sand blasted. I used them for testing and the one that was raw metal did not oxidise, but the ones I treated with rust remover all got flash rust. Seat soaked overnight in very mild pool acid solution and cleaned with wap.
Bottom left Crud Kutter
Top left Deoxidene
Right raw metal after sandblast.
All have been rinsed in water to be clean, even the raw piece and that has the least new rust. Middle is RB10, bottom is Duram.
The Engine lid was sandblasted, all blemishes filled and cleaned with acetone and then primed with 1K etch filler primer.
Very pleased with the result.
What this taught me is that I will have to sandblast everything myself and do it in stages one section at a time. It will be very difficult to sandblast everything clean it and paint it before it is contaminated again.
Hope this will help someone. I did a lot of googling with no clear result or recommendation, hence experimenting myself.
You do not have the required permissions to view the files attached to this post.
Wanted parts:
Left sunvisor
Sink faucet
Exhaust to swap for Beetle exhaust
Left sunvisor
Sink faucet
Exhaust to swap for Beetle exhaust
-
fourier
- Oil Cooler
- Posts: 342
- Joined: Fri Sep 26, 2008 1:21 pm
- What model do you have?: '59 Ghia, '77 Beetle
- Location: Melkbosstrand, Cape Town
- Has thanked: 31 times
- Been thanked: 37 times
Re: '70 Westfalia Project
Thanks for the sharing your experience with all the different processes.
I clean all my bare metal parts using Deoxidene. I use undiluted product to remove all traces of rust. Then I use a dry rag or paper towel to remove as much Deoxidene as possible. You only want a slight film left on the metal. The part is then left to dry to a dark grey colour. I sometimes leave the parts in this state for months, and just give it a good scuff before primer, with no sign of flash rust.
NEVER rinse the parts in water after cleaning them, that causes the flash rust to appear. Just wipe the excess Deoxidene, and allow to dry.
(o= i =o) (o\ ! /o)
-
AlanH
- Crankshaft
- Posts: 763
- Joined: Thu Jan 17, 2013 7:20 am
- What model do you have?: '70 Westy
- Location: Pretoria
- Has thanked: 125 times
- Been thanked: 86 times
Re: '70 Westfalia Project
Thanks Fourier,
I also found Deoxidene to be the cheapest. I also applied it undiluted and after about 15 - 20 min rinsed it with water as the directions say. I then blasted the parts dry with compressed air and left them in the sun. They also did not get flash rust.
This is however not always possible or desirable if you for instance wan to clean a large body panel. One won't be able to dry it quick enough.
I am happy to hear you did not rinse of the deoxidene and did not have any issues. That will probably be my modus operandi for the larger and more inaccessible places.
If anyone has better ideas I'm all ears.
Wanted parts:
Left sunvisor
Sink faucet
Exhaust to swap for Beetle exhaust
Left sunvisor
Sink faucet
Exhaust to swap for Beetle exhaust
-
jacquesbotha
- Drip
- Posts: 48
- Joined: Sun Oct 13, 2019 7:50 am
- What model do you have?: 1973 Beetle 1600
- Location: Pretoria
- Has thanked: 7 times
- Been thanked: 3 times
Re: '70 Westfalia Project
Maybe to dry larger parts like body panels, use your yard blower?AlanH wrote: Tue May 19, 2020 7:11 am Thanks Fourier,
I also found Deoxidene to be the cheapest. I also applied it undiluted and after about 15 - 20 min rinsed it with water as the directions say. I then blasted the parts dry with compressed air and left them in the sun. They also did not get flash rust.
This is however not always possible or desirable if you for instance wan to clean a large body panel. One won't be able to dry it quick enough.
I am happy to hear you did not rinse of the deoxidene and did not have any issues. That will probably be my modus operandi for the larger and more inaccessible places.
If anyone has better ideas I'm all ears.
-
fourier
- Oil Cooler
- Posts: 342
- Joined: Fri Sep 26, 2008 1:21 pm
- What model do you have?: '59 Ghia, '77 Beetle
- Location: Melkbosstrand, Cape Town
- Has thanked: 31 times
- Been thanked: 37 times
Re: '70 Westfalia Project
There is really no need to force-dry anything. Just leave the parts to dry naturally. Allow the part to dry completely, before paint is applied. As mentioned before, give the dry panel a good scuff just before primer. This applies to all parts, no matter how large. Really easy!jacquesbotha wrote: Tue May 19, 2020 8:27 amMaybe to dry larger parts like body panels, use your yard blower?AlanH wrote: Tue May 19, 2020 7:11 am Thanks Fourier,
I also found Deoxidene to be the cheapest. I also applied it undiluted and after about 15 - 20 min rinsed it with water as the directions say. I then blasted the parts dry with compressed air and left them in the sun. They also did not get flash rust.
This is however not always possible or desirable if you for instance wan to clean a large body panel. One won't be able to dry it quick enough.
I am happy to hear you did not rinse of the deoxidene and did not have any issues. That will probably be my modus operandi for the larger and more inaccessible places.
If anyone has better ideas I'm all ears.
(o= i =o) (o\ ! /o)
-
AlanH
- Crankshaft
- Posts: 763
- Joined: Thu Jan 17, 2013 7:20 am
- What model do you have?: '70 Westy
- Location: Pretoria
- Has thanked: 125 times
- Been thanked: 86 times
Re: '70 Westfalia Project
So, I let myself in for a whole can of worms. 
I put the Westy on the lift and started checking out the underside, especially the side belly plates that were bothering me. I always got a rat piss smell even though the nest inside the Westy behind a cupboard was removed years ago and the belly opened up and a wheelbarrow of rubbish removed including a rat skeleton. So I eventually plucked up enough courage to tackle this. I saw there were many spot welds but as I went along they seem to increase. I must have drilled out 50 or more spot welds just on the one side. Then the plates are seam welded as well. Anyway I just wedged a screwdriver into the plate and starter wiggling it to get some muck out of there so I can hopefully see whats happening. Well I removed about half a bucket of rats nest and . I will attempt to remove the complete belly plate another day.
I also drilled out the vrot part of where the Westy roof attaches. As mentioned in an earlier post I welded up the cracks, but I wasn't happy so I made nice 50mm discs that will have a thick washer on the underside all clamped together with a rivnut and then welded in. This should give me better support and also hopefully will last.
. I will attempt to remove the complete belly plate another day.
I also drilled out the vrot part of where the Westy roof attaches. As mentioned in an earlier post I welded up the cracks, but I wasn't happy so I made nice 50mm discs that will have a thick washer on the underside all clamped together with a rivnut and then welded in. This should give me better support and also hopefully will last.
I put the Westy on the lift and started checking out the underside, especially the side belly plates that were bothering me. I always got a rat piss smell even though the nest inside the Westy behind a cupboard was removed years ago and the belly opened up and a wheelbarrow of rubbish removed including a rat skeleton. So I eventually plucked up enough courage to tackle this. I saw there were many spot welds but as I went along they seem to increase. I must have drilled out 50 or more spot welds just on the one side. Then the plates are seam welded as well. Anyway I just wedged a screwdriver into the plate and starter wiggling it to get some muck out of there so I can hopefully see whats happening. Well I removed about half a bucket of rats nest and
You do not have the required permissions to view the files attached to this post.
Wanted parts:
Left sunvisor
Sink faucet
Exhaust to swap for Beetle exhaust
Left sunvisor
Sink faucet
Exhaust to swap for Beetle exhaust
-
retrovan
- Donor
- Posts: 8710
- Joined: Mon Feb 07, 2011 8:51 pm
- What model do you have?: 52T1,68FB,72Bay,75FL
- Location: Eich! no, in Jefferys Bay
- Has thanked: 421 times
- Been thanked: 541 times
- Contact:
Re: '70 Westfalia Project
Good going there Alan
Keep the photos coming.
Herman
Keep the photos coming.
Herman
1952 Split Beetle 1835cc
1968 Fastback 2Lt.type4
1972 Low Light Bay Panel Van 2Lt type 4
1975 Fleetline Panel Van 1914cc
2020 MeFusco Beetle Truck 2Lt type 4
1972 FT Hahn SP 1776 cc
1968 Fastback 2Lt.type4
1972 Low Light Bay Panel Van 2Lt type 4
1975 Fleetline Panel Van 1914cc
2020 MeFusco Beetle Truck 2Lt type 4
1972 FT Hahn SP 1776 cc
-
Bugger
- Advertiser

- Posts: 7948
- Joined: Fri Jun 09, 2006 6:25 pm
- What model do you have?: a Few Models
- Facebook: Pierre Bugger Eksteen
- Location: Johannesbirg
- Has thanked: 18 times
- Been thanked: 58 times
Re: '70 Westfalia Project
Lots and lots of
The thing called Labor of love
Sent from my SM-G965F using Tapatalk
The thing called Labor of love
Sent from my SM-G965F using Tapatalk
Adapterplates Available for Rotary in Beetle and others aswell
And Special Boxes built for Rotary Conversions and Scubies
Pierre
082 600 8663
CLick on Banner Below to be routed to the Web site

And Special Boxes built for Rotary Conversions and Scubies
Pierre
082 600 8663
CLick on Banner Below to be routed to the Web site
-
Haans
- Camshaft
- Posts: 899
- Joined: Wed Apr 20, 2016 7:10 pm
- What model do you have?: 1960 ghia
- Location: Nelson Mandela Metro
- Has thanked: 1 time
- Been thanked: 107 times
Re: '70 Westfalia Project
Impressive,..your contolled "handling" of a broom !!!


Nice job,.....will you get time to go back to your day job?
 ......
Haans


Nice job,.....will you get time to go back to your day job?

 ......
Haans