1971 Bay Window Project called Dr John.- FOR SALE

Give details and pictures of your ACVW projects here.
hendriks
Crankshaft
Posts: 747
Joined: Mon Oct 18, 2010 3:17 pm
What model do you have?: 71 bay
Location: Johannesburg, Randburg
Has thanked: 1 time
Been thanked: 13 times

Re: 1971 Bay Window Project called Dr John.

Post by hendriks »

fig wrote:Cool project Hendrik!

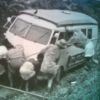
Since you're going to be in for a bit of cutting and welding anyway, why don't you consider cutting out the side window frames from the parts bus and welding them in to make the panel a "proper" kombi. Panels with windows cut in always look crap to my eye because the rubbers stand proud of the body.
hi fig,

That is exactly what we will be doing. It is the only way to have proper windows in the bus. Im not so sure when what will happen but for now I'm getting parts together for the transplant. Some things will happen quickly and others will take time (and money...).
User avatar
fig
Bus Driver
Posts: 12214
Joined: Fri Jan 20, 2006 10:08 pm
What model do you have?: Type 2
Facebook: https://www.facebook.com/groups/258896479219/
Location: Where life is cheap and death is free
Has thanked: 287 times
Been thanked: 322 times
Contact:
South Africa

Re: 1971 Bay Window Project called Dr John.

Post by fig »

hendriks wrote:Some things will happen quickly and others will take time (and money...).
And that, in a nutshell, is the story of living with old cars ... :wink:
fig
Kaapse Kombi Kult

"Whether you think you can or whether you think you can't, you're right." -- Henry Ford
hendriks
Crankshaft
Posts: 747
Joined: Mon Oct 18, 2010 3:17 pm
What model do you have?: 71 bay
Location: Johannesburg, Randburg
Has thanked: 1 time
Been thanked: 13 times

Re: 1971 Bay Window Project called Dr John.

Post by hendriks »

image[18].jpeg
image[17].jpeg
So this past weekend I fitted the "new" door - there was about 3kg mud inside the driver door...
We "installed" a temp plastic bag for the gaping hole where a window will go in later...
Cleaned a few bits on and put some temporary seats in the back for my kids - we then took Dr. John for a late afternoon drive.
I realised that the fuel guage is working - it just did not have enough fuel in before to get the needle to move.. :oops:
You do not have the required permissions to view the files attached to this post.
User avatar
Dazz
Oil Cooler
Posts: 390
Joined: Fri Aug 28, 2009 6:08 pm
What model do you have?: T3 Syncro
Location: Centurion
Has thanked: 2 times
Been thanked: 4 times

Re: 1971 Bay Window Project called Dr John.

Post by Dazz »

I can only imagine the exitement and uncontrollable smile
Measure twice CUTonce.

1975 Kombie
1979 Kombie
W203 C320 CDI
'68 Austin Cambridge A60

Looking for a kombi project
hendriks
Crankshaft
Posts: 747
Joined: Mon Oct 18, 2010 3:17 pm
What model do you have?: 71 bay
Location: Johannesburg, Randburg
Has thanked: 1 time
Been thanked: 13 times

Re: 1971 Bay Window Project called Dr John.

Post by hendriks »

Hi,

My middle and the base of the rear seat arrived last night - All the way from East London.

Also have a Early Bay badge that is in Nelspruit..... - Thanks Johann!!

This weekend I will be cutting into my parts bus. I will need several body panels and pieces to help fix the dents and rust of old Dr John.

will take some photos this weekend.
hendriks
Crankshaft
Posts: 747
Joined: Mon Oct 18, 2010 3:17 pm
What model do you have?: 71 bay
Location: Johannesburg, Randburg
Has thanked: 1 time
Been thanked: 13 times

Re: 1971 Bay Window Project called Dr John.

Post by hendriks »

Hi all,

So the last few weeks I have been busy with all kinds of stuff

I made a deal with Retrobug and after swapping some parts out, I now have a full length roof rack for Dr. John!! :hangloose: :hangloose: :hangloose:
It needs a few bits and a new coat of paint, but it's what I wanted.

Also I am busy preparing the window frames from a late bay to be welded into place for Dr. John. (this is part of the panel -to-transporter-conversion...)
It is quite a story because you have to remove the "inner window section" to get to the safety belt bracket, then the outside frame can be cut out. I have removed one window - the one behind the sliding door - 106 spot welds to get the "inner" out...

I am aslo replacing the panel below the abovementioned window so there are some spot welds to remove as well.

Pics to follow later...
You do not have the required permissions to view the files attached to this post.
Last edited by hendriks on Tue May 20, 2014 4:28 pm, edited 1 time in total.
User avatar
Kneeslider
Drip
Posts: 6
Joined: Mon Feb 06, 2012 11:27 am
What model do you have?: Beetle
Facebook: http://www.facebook.com/profile.php?id=779539766
Location: Cape Town
Been thanked: 1 time
Contact:

Re: 1971 Bay Window Project called Dr John.

Post by Kneeslider »

Wow, big project, nice that it is pretty much complete.
Going to be a good one, awaiting updates, keep up the good work. :hangloose:
http://classiccyclecabin.wix.com/classiccyclecabin
Auto restorer and refinisher extraordinaire.
From rust bucket to show winner with care and passion.
hendriks
Crankshaft
Posts: 747
Joined: Mon Oct 18, 2010 3:17 pm
What model do you have?: 71 bay
Location: Johannesburg, Randburg
Has thanked: 1 time
Been thanked: 13 times

Re: 1971 Bay Window Project called Dr John.

Post by hendriks »

Here are some pics of the donor bus while I was busy removing the window frames and other bits I need for Dr.John. Sad to see a bus like that, but in all fairness; the green bus did not have a roof, floor, or engine or papers. also had a lot of rust.... (now I feel better about cutting up a bus for another bus....)

Some pics - Your comments are welcome!
You do not have the required permissions to view the files attached to this post.
User avatar
Retrobug
Donor
Donor
Posts: 1664
Joined: Mon Jan 23, 2012 7:45 pm
What model do you have?: 1962 Beetle
Location: Alberton ZA
Has thanked: 15 times
Been thanked: 32 times
Contact:

Re: 1971 Bay Window Project called Dr John.

Post by Retrobug »

Dr John is looking good with the rack! :hangloose:
Going to be awesome when the Doctor is done with surgery! 8)
The two secrets to success: 1) Don't tell everyone everything that you know

http://www.aircooledvwsa.co.za/viewtopi ... 23&t=24181
hendriks
Crankshaft
Posts: 747
Joined: Mon Oct 18, 2010 3:17 pm
What model do you have?: 71 bay
Location: Johannesburg, Randburg
Has thanked: 1 time
Been thanked: 13 times

Re: 1971 Bay Window Project called Dr John.

Post by hendriks »

Retrobug wrote:Dr John is looking good with the rack! :hangloose:
Going to be awesome when the Doctor is done with surgery! 8)
Hi Retrobug.

Thanks man! A lot of work ahead.

I bought a small MiG welder this week. Now i have to learn how to use it hey.... The idea is that i do as much work myself as possible- so far so good.
hendriks
Crankshaft
Posts: 747
Joined: Mon Oct 18, 2010 3:17 pm
What model do you have?: 71 bay
Location: Johannesburg, Randburg
Has thanked: 1 time
Been thanked: 13 times

Re: 1971 Bay Window Project called Dr John.

Post by hendriks »

So last week I got a
MIG welder but havnt had a chance to even test it. Hopefully soon!

Got a battery for Dr.John. Connected it last night and now the bus starts withiut having to jump start it

Man i cannot wait to drive this bus.
hendriks
Crankshaft
Posts: 747
Joined: Mon Oct 18, 2010 3:17 pm
What model do you have?: 71 bay
Location: Johannesburg, Randburg
Has thanked: 1 time
Been thanked: 13 times

Re: 1971 Bay Window Project called Dr John.

Post by hendriks »

I finally have a rear bench seat for Dr. John!!

It is from a late delux bay and is a vw build sleeper (rock&roll) bed!! I'm very chuffed. will take some pics over the weekend.

I spent about an hour removing all the spares and tools and rubbish out the bus and then fitted 3 door carts (long section opposite the sliding door adn the two small pieces next to the rear seat and then the matching middle and rear seat!!. Because the bus used to be a panel van, there are nowhere to bolt the chairs down... yet. I will be welding some on in future.

the same goes for the back and seat belts. there are no mounting points at this stage, but we will get there!!

Stadig maar sekser!!
User avatar
Dazz
Oil Cooler
Posts: 390
Joined: Fri Aug 28, 2009 6:08 pm
What model do you have?: T3 Syncro
Location: Centurion
Has thanked: 2 times
Been thanked: 4 times

Re: 1971 Bay Window Project called Dr John.

Post by Dazz »

Im glad you found a bench seat. If you say vw built do you mean a factory made unit. Does it look like a normal seat?
Measure twice CUTonce.

1975 Kombie
1979 Kombie
W203 C320 CDI
'68 Austin Cambridge A60

Looking for a kombi project
hendriks
Crankshaft
Posts: 747
Joined: Mon Oct 18, 2010 3:17 pm
What model do you have?: 71 bay
Location: Johannesburg, Randburg
Has thanked: 1 time
Been thanked: 13 times

Re: 1971 Bay Window Project called Dr John.

Post by hendriks »

Dazz wrote:Im glad you found a bench seat. If you say vw built do you mean a factory made unit. Does it look like a normal seat?

it came with the late bay I got it from, middle and back seats covered in same material adn same design.

it is a little different from the bench seats I have seen before - usually theres springs under the seat, but these have a foam base.

Everything else lines up.
I will take pics and post.
hendriks
Crankshaft
Posts: 747
Joined: Mon Oct 18, 2010 3:17 pm
What model do you have?: 71 bay
Location: Johannesburg, Randburg
Has thanked: 1 time
Been thanked: 13 times

Re: 1971 Bay Window Project called Dr John.

Post by hendriks »

Hi there,

After not doing much on the bus for a few weeks i got to do some work.

I have welded the first outer skin of the window frame into place behind the sliding door. I used the mig welder for the first time and although it is easy, i need loads of practise.....

Here are some pics of the "new window frame" amd the damaged panel that had been removed. Still a lot to do and at this stage it looks like im stripping the bus for spares, but it will hopefully soon look better and more like a kombi again...

Any comments are welcome!!
You do not have the required permissions to view the files attached to this post.
Post Reply