Farnham? There's about three of them, including one near Woodbridge IP 16.... come a little closer... please...
Oh, in Surrey... OK...
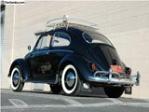
"BOBBIE" the '63 Beetle - aka BB / Rosie
-
Ron&Gill

- Full-time Bug Nutter
- Posts: 4054
- Joined: Fri Aug 29, 2008 4:16 am
- What model do you have?: Type 1, 21b, 34, 316
- Location: St Lucia KZN/Cameron LA
- Has thanked: 1 time
- Been thanked: 21 times

Re: "BOBBIE" the '63 Beetle - aka BB / Rosie
1964 T34 - The Razor: viewtopic.php?f=23&t=10290
1956 T2 1b - Gill's bus: viewtopic.php?f=23&t=10948
1967 T316 - viewtopic.php?f=23&t=10931 & viewtopic.php?f=23&t=15977
2000 beach buggy - viewtopic.php?f=23&t=10915
1956 T2 1b - Gill's bus: viewtopic.php?f=23&t=10948
1967 T316 - viewtopic.php?f=23&t=10931 & viewtopic.php?f=23&t=15977
2000 beach buggy - viewtopic.php?f=23&t=10915
-
eben
- Site Admin
- Posts: 6449
- Joined: Tue Sep 13, 2005 3:40 pm
- What model do you have?: None
- Facebook: www.facebook.com/ebenve
- Location: Fintice, Slovakia
- Has thanked: 91 times
- Been thanked: 54 times
- Contact:


Re: "BOBBIE" the '63 Beetle - aka BB / Rosie
I always get confused between Farnham, Farnborough, Fareham.......
-
Dutch_Diver

- Full-time Bug Nutter
- Posts: 4028
- Joined: Tue Nov 20, 2007 8:52 am
- What model do you have?: 64 bus & 63 Bug
- Facebook: www.facebook.com/people/Frank-Van-Hoof/576686903
- Location: St Ives, Dorset, UK
- Been thanked: 10 times
- Contact:
Re: "BOBBIE" the '63 Beetle - aka BB / Rosie
Surrey's the one. Show is at Basingstoke!
Had the bill today for Bobbie's test £300 +vat. I fainted, forgot the expense but even I think that's a lot for a fuse and a brake cylinder!
Had the bill today for Bobbie's test £300 +vat. I fainted, forgot the expense but even I think that's a lot for a fuse and a brake cylinder!
"MO" - 1965 Splitscreen bus --> http://www.aircooledvwsa.co.za/viewtopi ... =37&t=9305" onclick="window.open(this.href);return false;
"BOBBIE" - 1963 Beetle --> http://www.aircooledvwsa.co.za/viewtopi ... 23&t=11338" onclick="window.open(this.href);return false;
"BOBBIE" - 1963 Beetle --> http://www.aircooledvwsa.co.za/viewtopi ... 23&t=11338" onclick="window.open(this.href);return false;
-
Ron&Gill
- Full-time Bug Nutter
- Posts: 4054
- Joined: Fri Aug 29, 2008 4:16 am
- What model do you have?: Type 1, 21b, 34, 316
- Location: St Lucia KZN/Cameron LA
- Has thanked: 1 time
- Been thanked: 21 times
Re: "BOBBIE" the '63 Beetle - aka BB / Rosie
But you've got the MOT. How did Mo make out?
1964 T34 - The Razor: viewtopic.php?f=23&t=10290
1956 T2 1b - Gill's bus: viewtopic.php?f=23&t=10948
1967 T316 - viewtopic.php?f=23&t=10931 & viewtopic.php?f=23&t=15977
2000 beach buggy - viewtopic.php?f=23&t=10915
1956 T2 1b - Gill's bus: viewtopic.php?f=23&t=10948
1967 T316 - viewtopic.php?f=23&t=10931 & viewtopic.php?f=23&t=15977
2000 beach buggy - viewtopic.php?f=23&t=10915
-
Dutch_Diver
- Full-time Bug Nutter
- Posts: 4028
- Joined: Tue Nov 20, 2007 8:52 am
- What model do you have?: 64 bus & 63 Bug
- Facebook: www.facebook.com/people/Frank-Van-Hoof/576686903
- Location: St Ives, Dorset, UK
- Been thanked: 10 times
- Contact:
Re: "BOBBIE" the '63 Beetle - aka BB / Rosie
Mo went in yesterday so we could get a work list. A few more items but I knew Mo would have issues as the work was done by Brian not Jurgen.
Main items, rough rear wheel bearings, passenger door handle does not work, some corrosion underneath, some incorrect welding in structural points, play in the steering, seatbelts not standard, brake lights not working...... Interestly, they didn't spot the fuel leak from the broke pump but that's getting fixed as I don't want a fire after all this hassle, cost and stress
Main items, rough rear wheel bearings, passenger door handle does not work, some corrosion underneath, some incorrect welding in structural points, play in the steering, seatbelts not standard, brake lights not working...... Interestly, they didn't spot the fuel leak from the broke pump but that's getting fixed as I don't want a fire after all this hassle, cost and stress
"MO" - 1965 Splitscreen bus --> http://www.aircooledvwsa.co.za/viewtopi ... =37&t=9305" onclick="window.open(this.href);return false;
"BOBBIE" - 1963 Beetle --> http://www.aircooledvwsa.co.za/viewtopi ... 23&t=11338" onclick="window.open(this.href);return false;
"BOBBIE" - 1963 Beetle --> http://www.aircooledvwsa.co.za/viewtopi ... 23&t=11338" onclick="window.open(this.href);return false;
-
Dutch_Diver
- Full-time Bug Nutter
- Posts: 4028
- Joined: Tue Nov 20, 2007 8:52 am
- What model do you have?: 64 bus & 63 Bug
- Facebook: www.facebook.com/people/Frank-Van-Hoof/576686903
- Location: St Ives, Dorset, UK
- Been thanked: 10 times
- Contact:
Re: "BOBBIE" the '63 Beetle - aka BB / Rosie
Very good point! But now I find out that Pickford messed up on the import and haven't inform customs and exise so I can register! That's now next weeks tasks.Ron&Gill wrote:But you've got the MOT. ?
"MO" - 1965 Splitscreen bus --> http://www.aircooledvwsa.co.za/viewtopi ... =37&t=9305" onclick="window.open(this.href);return false;
"BOBBIE" - 1963 Beetle --> http://www.aircooledvwsa.co.za/viewtopi ... 23&t=11338" onclick="window.open(this.href);return false;
"BOBBIE" - 1963 Beetle --> http://www.aircooledvwsa.co.za/viewtopi ... 23&t=11338" onclick="window.open(this.href);return false;
-
Ron&Gill
- Full-time Bug Nutter
- Posts: 4054
- Joined: Fri Aug 29, 2008 4:16 am
- What model do you have?: Type 1, 21b, 34, 316
- Location: St Lucia KZN/Cameron LA
- Has thanked: 1 time
- Been thanked: 21 times
Re: "BOBBIE" the '63 Beetle - aka BB / Rosie
Take her to Paul to fix...  Job done in a jiffy, no hassle.
1964 T34 - The Razor: viewtopic.php?f=23&t=10290
1956 T2 1b - Gill's bus: viewtopic.php?f=23&t=10948
1967 T316 - viewtopic.php?f=23&t=10931 & viewtopic.php?f=23&t=15977
2000 beach buggy - viewtopic.php?f=23&t=10915
1956 T2 1b - Gill's bus: viewtopic.php?f=23&t=10948
1967 T316 - viewtopic.php?f=23&t=10931 & viewtopic.php?f=23&t=15977
2000 beach buggy - viewtopic.php?f=23&t=10915
-
Dutch_Diver
- Full-time Bug Nutter
- Posts: 4028
- Joined: Tue Nov 20, 2007 8:52 am
- What model do you have?: 64 bus & 63 Bug
- Facebook: www.facebook.com/people/Frank-Van-Hoof/576686903
- Location: St Ives, Dorset, UK
- Been thanked: 10 times
- Contact:
Re: "BOBBIE" the '63 Beetle - aka BB / Rosie
Worked on Bobbie today to get ready for Sandown!
Need some help from the masters, tried to fit seatbelt and found all the mounting holes, all apart from the one I'm sure there should be down along side the seat. Can anyone post a picture of where it's located so I can finish mounting the 3 point seat belts that I've been storing for about 2 years?
Need some help from the masters, tried to fit seatbelt and found all the mounting holes, all apart from the one I'm sure there should be down along side the seat. Can anyone post a picture of where it's located so I can finish mounting the 3 point seat belts that I've been storing for about 2 years?
"MO" - 1965 Splitscreen bus --> http://www.aircooledvwsa.co.za/viewtopi ... =37&t=9305" onclick="window.open(this.href);return false;
"BOBBIE" - 1963 Beetle --> http://www.aircooledvwsa.co.za/viewtopi ... 23&t=11338" onclick="window.open(this.href);return false;
"BOBBIE" - 1963 Beetle --> http://www.aircooledvwsa.co.za/viewtopi ... 23&t=11338" onclick="window.open(this.href);return false;
-
karmakoma
- Full-time Bug Nutter
- Posts: 4126
- Joined: Sat Mar 29, 2008 9:11 pm
- What model do you have?: 69 dual trunk coupe
- Location: Gauteng
- Has thanked: 1 time
- Been thanked: 8 times
Re: "BOBBIE" the '63 Beetle - aka BB / Rosie
Frank, if memory serves, the early sixties SA beetles, did not have 3 seatbelt mounting points. Only one on the central tunnel and one on the B pillar for a type of over the shoulder belt. Hope I am wrong!
That is of course if you are talking about the one on the door side of the seat, otherwise the central tunnel mounting point should be just a little bit behind the handbrake on the side of the tunnel?
That is of course if you are talking about the one on the door side of the seat, otherwise the central tunnel mounting point should be just a little bit behind the handbrake on the side of the tunnel?
-
Farhaad

- Fuel Injection
- Posts: 2114
- Joined: Sat Jun 27, 2009 10:52 pm
- What model do you have?: memories
- Location: cape town
- Been thanked: 2 times
Re: "BOBBIE" the '63 Beetle - aka BB / Rosie
i had the same issue, looking for the 3 point holes and couldnt find any. only to discover that those models came with a " over the lap" seat belt. similar to the ones you find on planes. they mount on the centre tunel just behind the seat and somewhere on the B pillar close to the pan. use a sharp object and try to locate the hole by piecing the vinyl.
-
Dutch_Diver
- Full-time Bug Nutter
- Posts: 4028
- Joined: Tue Nov 20, 2007 8:52 am
- What model do you have?: 64 bus & 63 Bug
- Facebook: www.facebook.com/people/Frank-Van-Hoof/576686903
- Location: St Ives, Dorset, UK
- Been thanked: 10 times
- Contact:
Re: "BOBBIE" the '63 Beetle - aka BB / Rosie
That's the problem, I can't find one on the heater channel so I'm assuming KK is right any in the early beetles it was a single diagonal belt and not a lap belt like on planes. Will check again this weekend but spend 2 hours on Sunday trying to find. Anyone have a pic?
"MO" - 1965 Splitscreen bus --> http://www.aircooledvwsa.co.za/viewtopi ... =37&t=9305" onclick="window.open(this.href);return false;
"BOBBIE" - 1963 Beetle --> http://www.aircooledvwsa.co.za/viewtopi ... 23&t=11338" onclick="window.open(this.href);return false;
"BOBBIE" - 1963 Beetle --> http://www.aircooledvwsa.co.za/viewtopi ... 23&t=11338" onclick="window.open(this.href);return false;
-
Dutch_Diver
- Full-time Bug Nutter
- Posts: 4028
- Joined: Tue Nov 20, 2007 8:52 am
- What model do you have?: 64 bus & 63 Bug
- Facebook: www.facebook.com/people/Frank-Van-Hoof/576686903
- Location: St Ives, Dorset, UK
- Been thanked: 10 times
- Contact:
Re: "BOBBIE" the '63 Beetle - aka BB / Rosie
No still can't see the mounting hole........ Only an a...hole 
"MO" - 1965 Splitscreen bus --> http://www.aircooledvwsa.co.za/viewtopi ... =37&t=9305" onclick="window.open(this.href);return false;
"BOBBIE" - 1963 Beetle --> http://www.aircooledvwsa.co.za/viewtopi ... 23&t=11338" onclick="window.open(this.href);return false;
"BOBBIE" - 1963 Beetle --> http://www.aircooledvwsa.co.za/viewtopi ... 23&t=11338" onclick="window.open(this.href);return false;
-
Dutch_Diver
- Full-time Bug Nutter
- Posts: 4028
- Joined: Tue Nov 20, 2007 8:52 am
- What model do you have?: 64 bus & 63 Bug
- Facebook: www.facebook.com/people/Frank-Van-Hoof/576686903
- Location: St Ives, Dorset, UK
- Been thanked: 10 times
- Contact:
Re: "BOBBIE" the '63 Beetle - aka BB / Rosie
OK, as no one on here could be bothered to help with some technical advice, i went to the competition.....for our future reference.....
Seatbelt mounting points for early beetles....
<insert painful blinking red text here>
-- WARNING --
I ASSUME NO LIABILITY FOR THE SAFETY OR EFFECTIVENESS OF THIS
MODIFICATION.
I am not an automobile manufacturer, I do not work for the department of transportation. The modification described below carries NO warranty of effectiveness or safety.
I did this modification to my car because it had NOTHING in the way of passive restraints. These mods might not even work at all in the event of an accident. If you do something similar, don't even think about suing me if you get hurt in an accident. You do what what you want, I'll do what I want. We are both responsible for our own actions. I assume NO responsibility forthe safety or effectiveness of this modification.
--------------------------------------------------------------------------------
Symptom- You have a pre '62 Beetle and would like to add lap belts to it. The sunroof is very nice, but the thought of exiting the vehicle via it is unappealing.
Introduction
As I said in my '57 resto Pages, I am as much of a vintage preservationist as the next guy, but when it comes to seat belts, I won't give in. I just feel too unsafe driving a Beetle around with something around my middle to "keep the body with the car". Yeah, I logged several hundred miles on the split sans belts, but prior to the 2001 DKF Fall Cruise, I felt the need to get something in the car. My wife and I would probably log some 400 miles that weekend being pushed by the feeble 25 horse engine.
I opted not to go for the full scale 3 point belts this time, in the interest of simplicity and the fact that I wasn't willing to rip into the B pillars on this car just yet (plus those sill semaphores would be in the way, wouldn't they?). I opted for the simple 2 point lap belts that Wolfsburg West sells. They came in a nice light brown that went with my interior nicely, and were only $20 a piece.
Simple yes, but of course the anal side of me kicked in when I saw the hardware kits that came with them, and I had to go make it more complicated. A bit. The hardware set is a 7/16 high grade bolt and nut and big old fat fender washer. The plan is to drill holes in the floorpans and using the washers underneath, bolt them in. But I didn't like the big washers, I thought they would look odd, like a "bolt on", and I didn't like the way they fit on the contours of the pan. So I set out to design my own solution that would meet my picky tastes.
By the way, if you want to see the 3 point setup I implemented in my '57, see pages 10 and 21.
Scab Plates
I favored the idea of the "scab plate" which is just plate of steel onto which a nut is welded. The idea is the weld just keeps the nut over the hole in the plate, and does not contribute to the strain/stress performance of the overall solution. That is, with the nut not even welded to the plate, the solution offers the same anchoring strength. I used these plate extensively in the seat belt solution on the '57.
In this implementation, the scab plates were 3/16 mild steel with the 7/16-20 nuts (the ones that came with the Wolfsburg West belts, grade 10 or better I think) welded over 1/2" hold drilled in them. You might notice that some of the holes are drilled off the center longitudinal line. This is because when I made up these plates, I had already drilled the holes in the floor pans and realized that unless I made the plates off center a bit, the plate wouldn't sit neatly in the "channel" on the bottom of the pans. You will see what I mean later on.
The edges an corners on the plates were ground and smoothed (grindstone and wire brush wheel on bench grinder) and then the faces of the plates that would contact the pan underside were sprayed with Spies-Hecker's "red-brown" etching, anticorrosive primer.
The plates were roughly 1.75" x 3.75" (44.5mm x 95mm).
See Early_Belts_2.JPG
Drilling the Floor
The Wolfsburg West belts came with very good instructions, on which were the locations of the mounting holes. They should be 5.5 inches ahead of a line that connects the B pillar openings side to side on the car (I know it looks a bit skewed here). The holes are 1/2" and I pilot drilled them first with a 1/8" bit. This allowed me to crawl under the car first and verify the location of the pilot hole before I "committed" and drilled the larger hole. You want the hole to be in the center of the little "channel" that is formed by the depressed area of the pan, and in the case of the inner mounts, the lip of the tunnel steel. This insures that the plate will sit down flush with the pan when it is bolted up.
And a warning about drilling through carpet that I mentioned in one of the '57 interior installation pages. It is very easy for a drill bit to "catch" on carpet, fabrics, padding etc., and before you can release the trigger have it de-thread a long line and ruin your precious interior. I learned this from my days as a car stereo installer. Two tricks. One is reverse the drill first and spin it full speed as you bear down a little. It will not snag, but will burn through the upholstery.
The other trick is to heat up a nail, bolt, screwdriver, whatever of the appropriate size, to near read hot, and burn through the upholstery prior to trying to drill the metal underneath it. Keep a fire extinguisher handy of you do this. If you are really concerned, one you get a hole safely through the upholstery, insert a small piece of tubing or straw and place the drill bit through it to keep errant snags away.
All that being said, the German Square weave carpet in this car (the expensive stuff) showed no propensity to catching on the drill bit and unraveling.
And lastly, for those of you shuddering at the image of holes being drilled in the floor of a 1950 Sunroof Beetle, let me tell you that these are not the original pans. They had been replaced, and actually the replacements patched over the last 51 years. My car is very nice, and complete, but it is not perfect. Had they been the original pans, I really don't think I would have been able to bring myself to do this.
See Early_Belts_1.JPG
Installing the Plates
This is what the newly drilled hole looks like from underneath, this is the inboard passenger side. And you can see the "channel" I am talking about. Bordered on one side by the floor "well" depression, and on the other side by the chassis tunnel bottom plate. The area that the plate will contact has been wirebrushed and wiped with mineral spirits to remove any loose dirt or grease. You do not wnat to take the pan down to the metal.
See Early_Belts_3.JPG
Here you see one of the plates installed. The tar looking stuff you see is Eastwood's brush on undercoating (which I am convinced is simply roof tar).
You can't see it here, but on the edges of the plates which go up against the side of the channel that rolls downward to form the floor "well", the edge is ground to a rounded taper do it doesn't tend to "cut into" the floorpan and remove paint/sealer and start rust. In this pic, the rounded edge would be the on teh backside of the plate, along the upper edge. The edge of the plate is rounded like a quarter circle. Make sense?
See Early_Belts_4.JPG
Bad picture, but you can see one of the outboard plates installed and couated with undercoating. Here, the edge of the plate was far enough away from the depressed floor well area that rounding its edge wasn't needed. There is ample "flat space" on the outboard sides for the 1.75" wide plates.
It was VERY difficult to flip the split on its side to take these pics.....
See Early_Belts_5.JPG
Here's the finished job. Note that the instructions on supplied by Wolfsburg West showed the inboard mounts on the lower part of the floor pan, just to the side of the "well". In my car, that would have put the belt mount under (through?) the rubber mat. I didn't like that idea and am not quite sure why they recommend that, unless it is that the round washer they supply wouldn't sit very well underneath.
Another shot of the completed job. The black seat cover on the driver's seat is just so I don't mess up the upholstery getting in and out of the car while I am working on it. This interior fabric isn't quite correct, but the light brown belts go nicely with it. Let's hope I never have to test them out!
See Early_Belts_6.JPG
See Early_Belts_7.JPG
You do not have the required permissions to view the files attached to this post.
"MO" - 1965 Splitscreen bus --> http://www.aircooledvwsa.co.za/viewtopi ... =37&t=9305" onclick="window.open(this.href);return false;
"BOBBIE" - 1963 Beetle --> http://www.aircooledvwsa.co.za/viewtopi ... 23&t=11338" onclick="window.open(this.href);return false;
"BOBBIE" - 1963 Beetle --> http://www.aircooledvwsa.co.za/viewtopi ... 23&t=11338" onclick="window.open(this.href);return false;
-
Dutch_Diver
- Full-time Bug Nutter
- Posts: 4028
- Joined: Tue Nov 20, 2007 8:52 am
- What model do you have?: 64 bus & 63 Bug
- Facebook: www.facebook.com/people/Frank-Van-Hoof/576686903
- Location: St Ives, Dorset, UK
- Been thanked: 10 times
- Contact:
Re: "BOBBIE" the '63 Beetle - aka BB / Rosie
Memories......people say looking back is bad, but not when it was so great! I still haven't fitted the seatbelts
"MO" - 1965 Splitscreen bus --> http://www.aircooledvwsa.co.za/viewtopi ... =37&t=9305" onclick="window.open(this.href);return false;
"BOBBIE" - 1963 Beetle --> http://www.aircooledvwsa.co.za/viewtopi ... 23&t=11338" onclick="window.open(this.href);return false;
"BOBBIE" - 1963 Beetle --> http://www.aircooledvwsa.co.za/viewtopi ... 23&t=11338" onclick="window.open(this.href);return false;